Description
This is a sample application that demonstrates a technique to keep a record history. This application was created using FEB 8.6 and must be imported to version 8.6 or greater.
Application Functional Walk Through
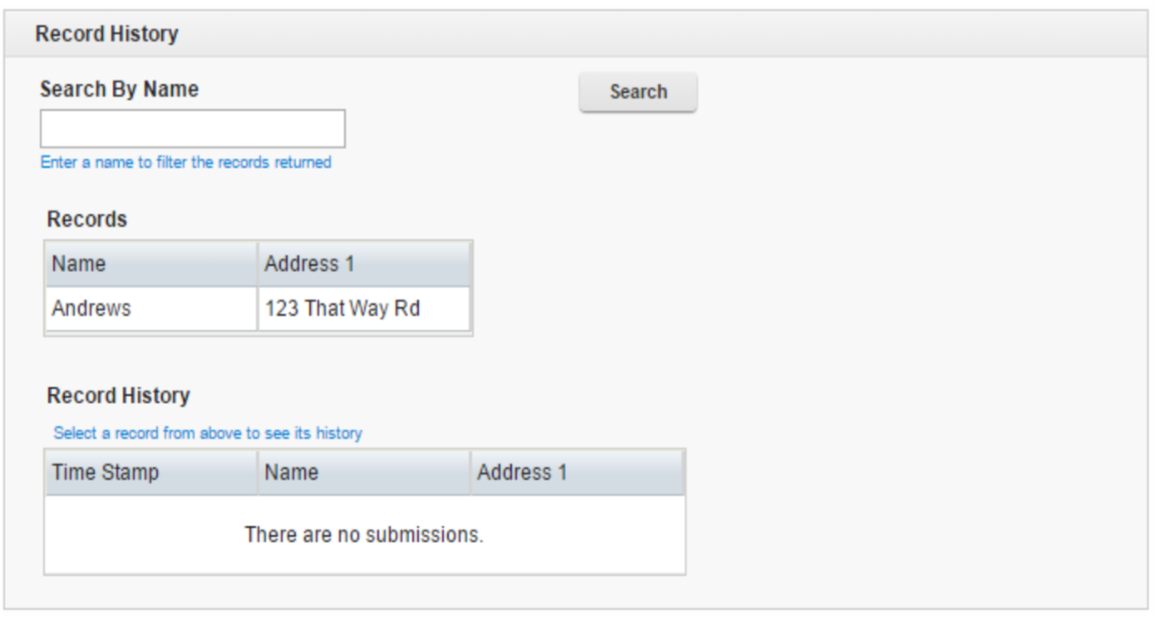
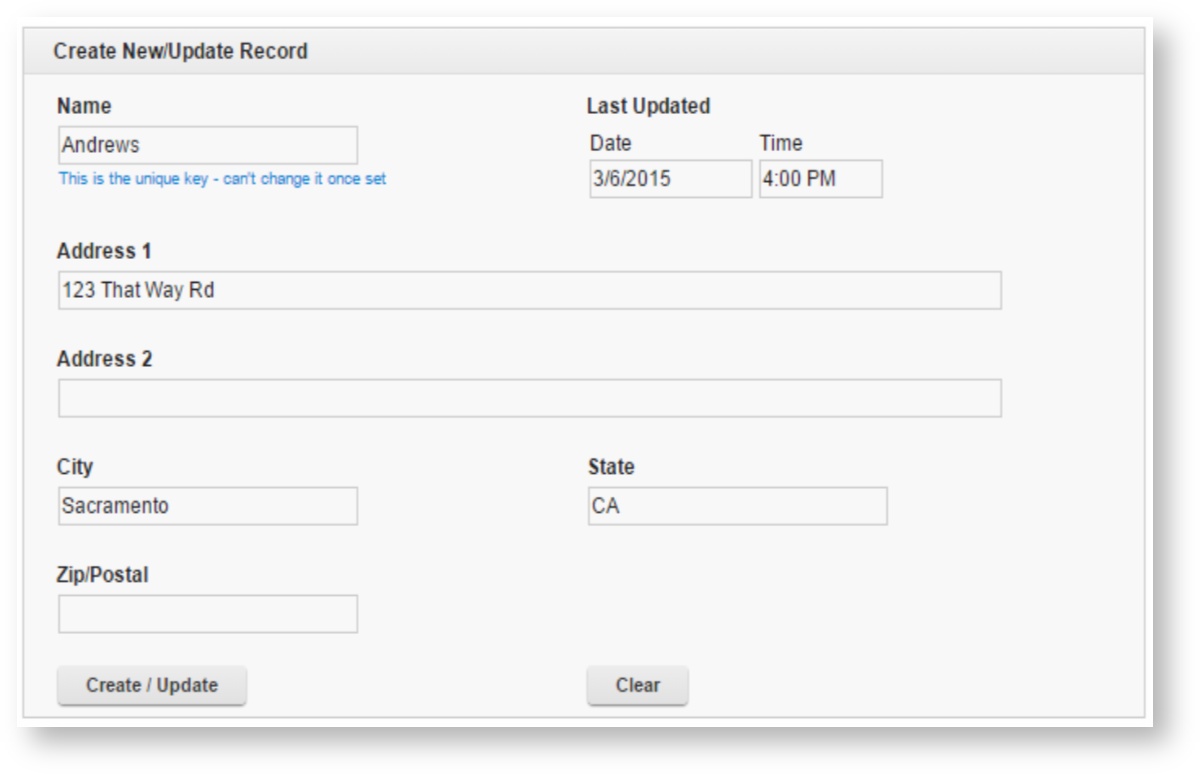
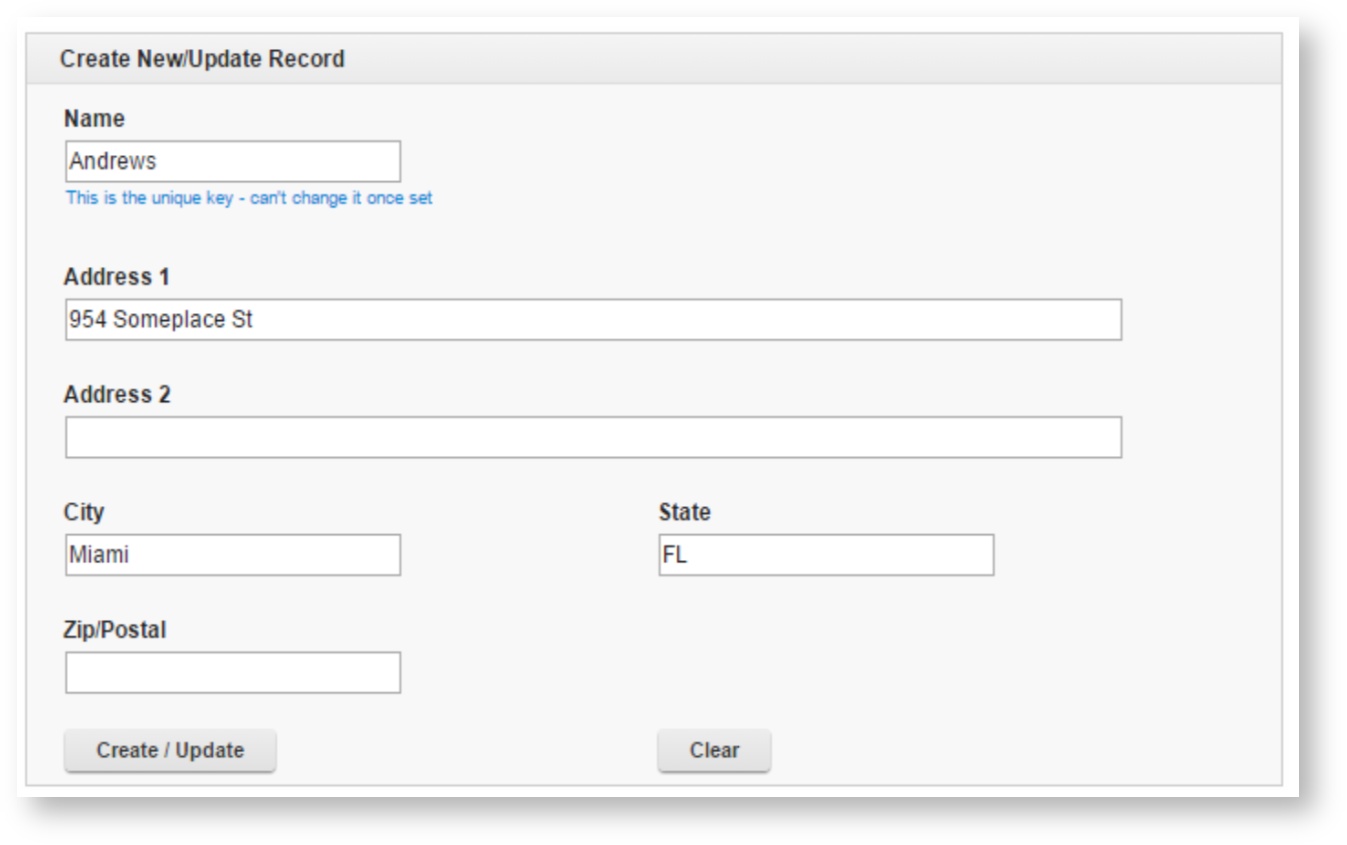
When you first launch the application there is no data, so let's enter some.

After you click Create / Update the Records table will be refreshed to show the new entry.
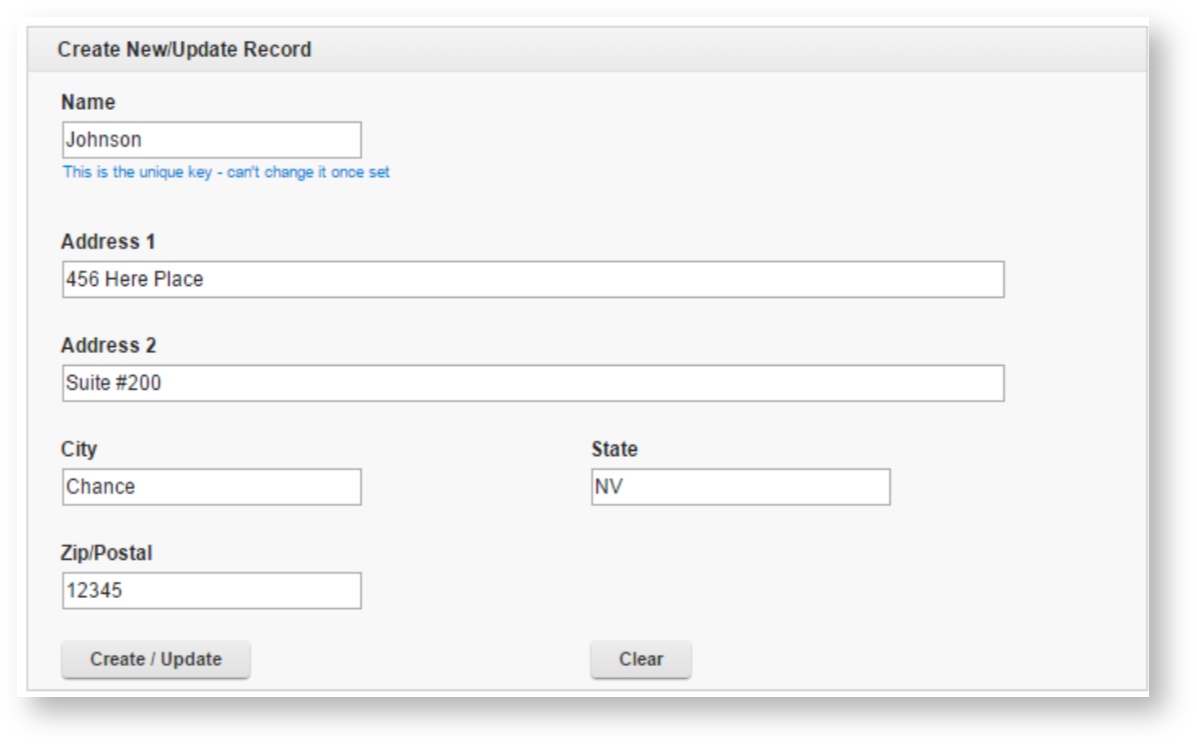
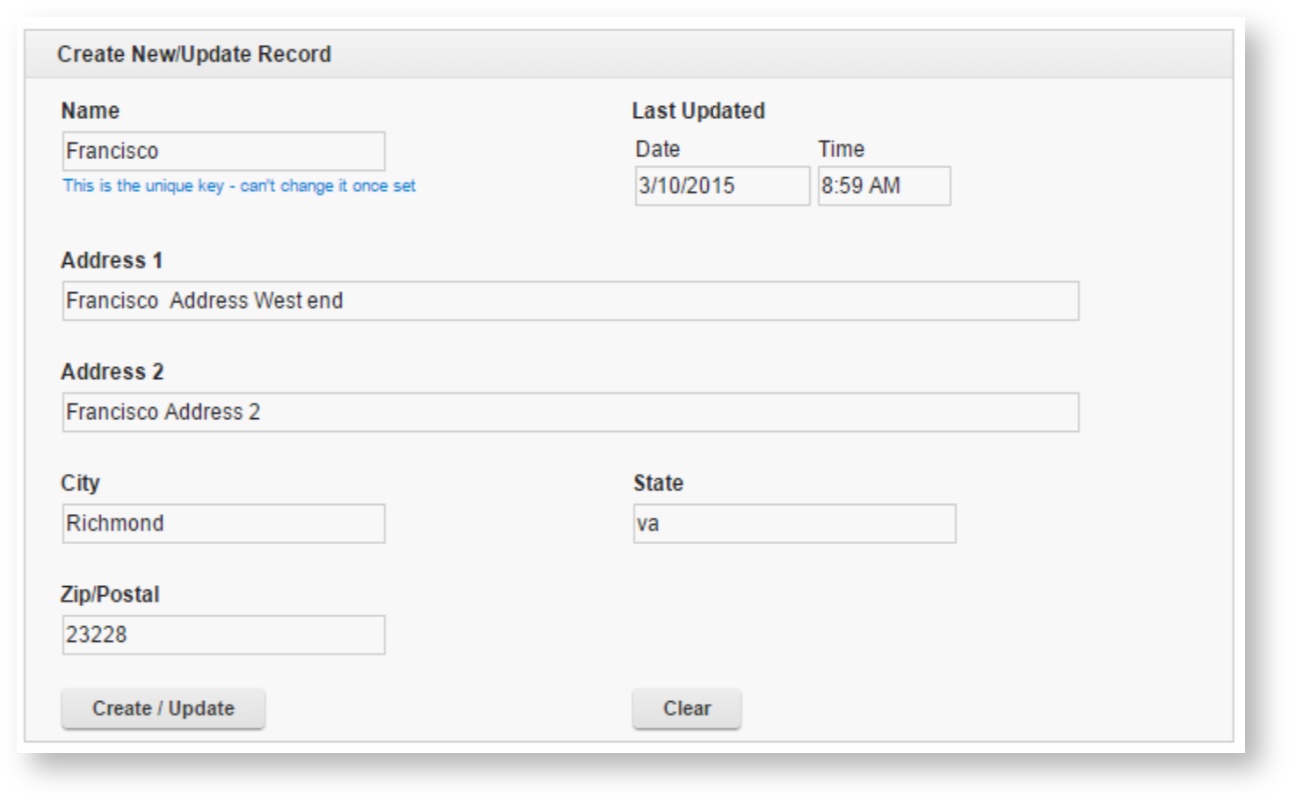
Let's create another unique entry.
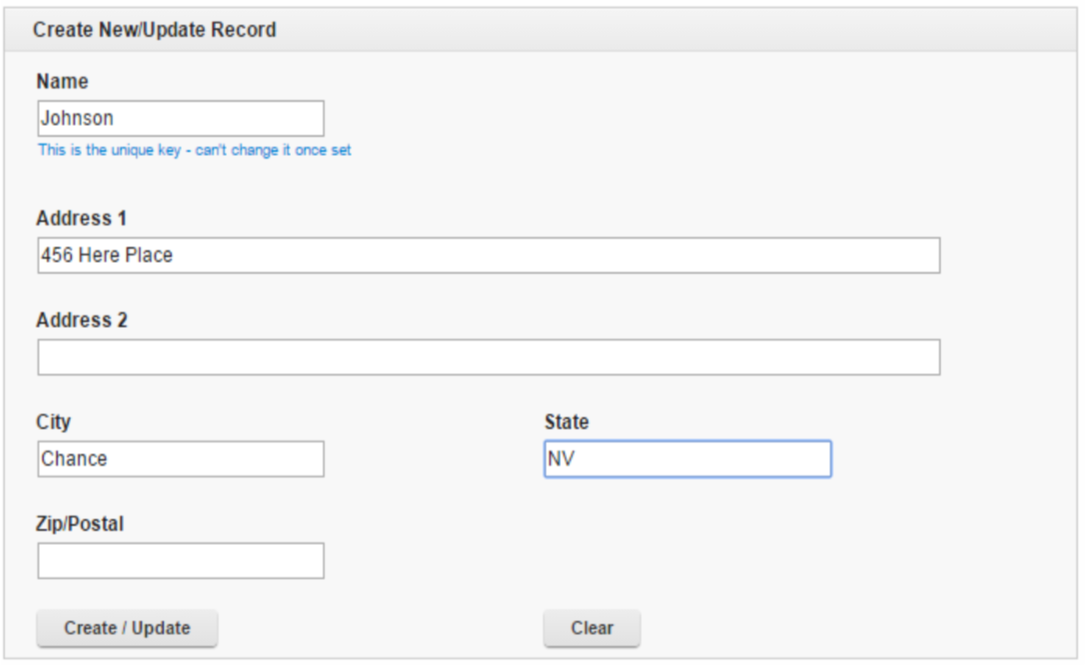
Note: that after creating a new record all the fields are cleared.
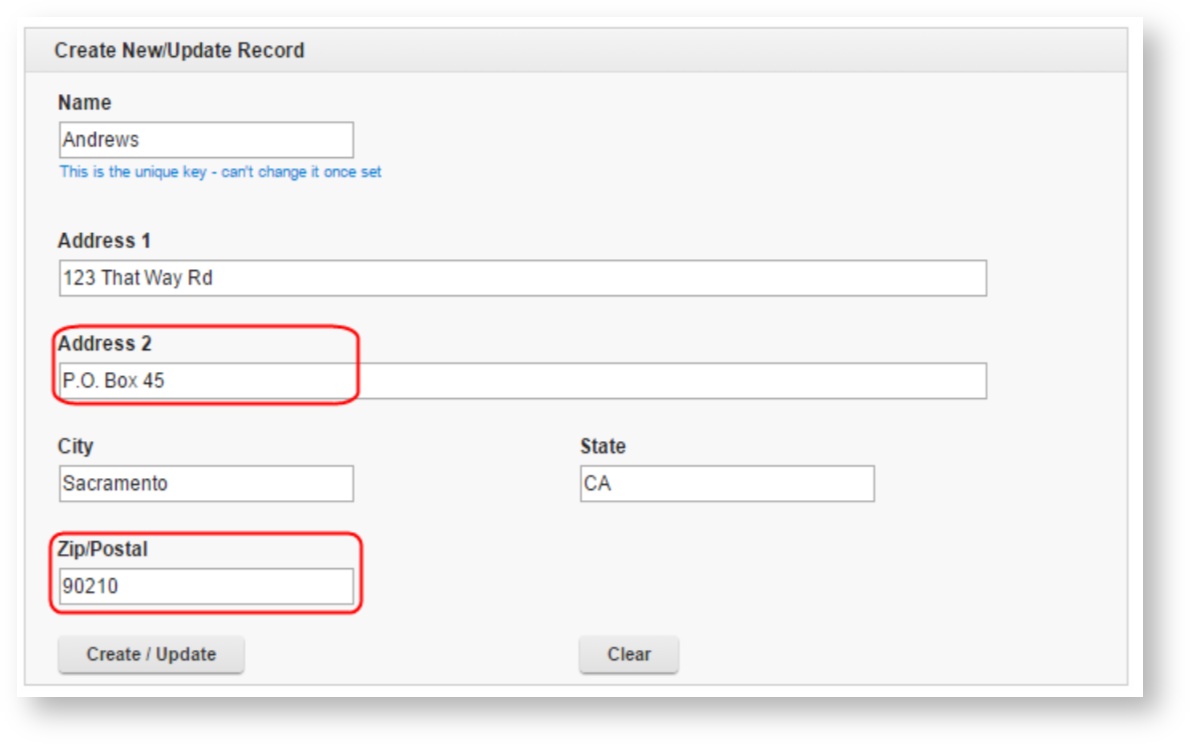
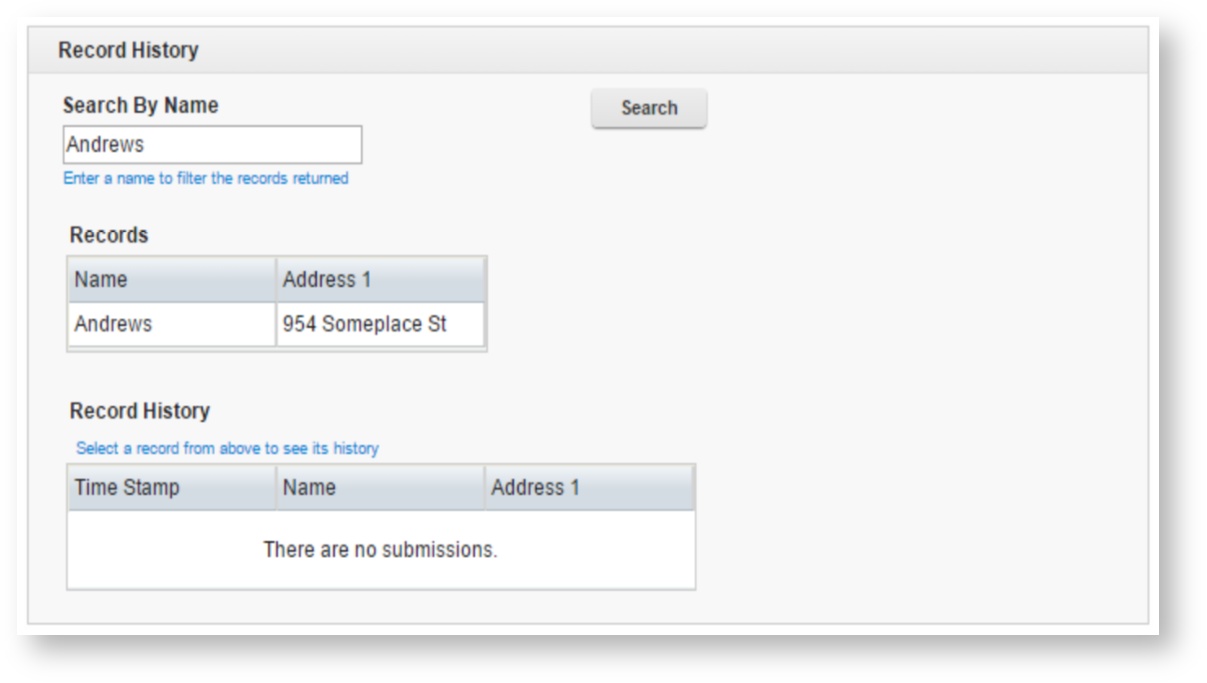
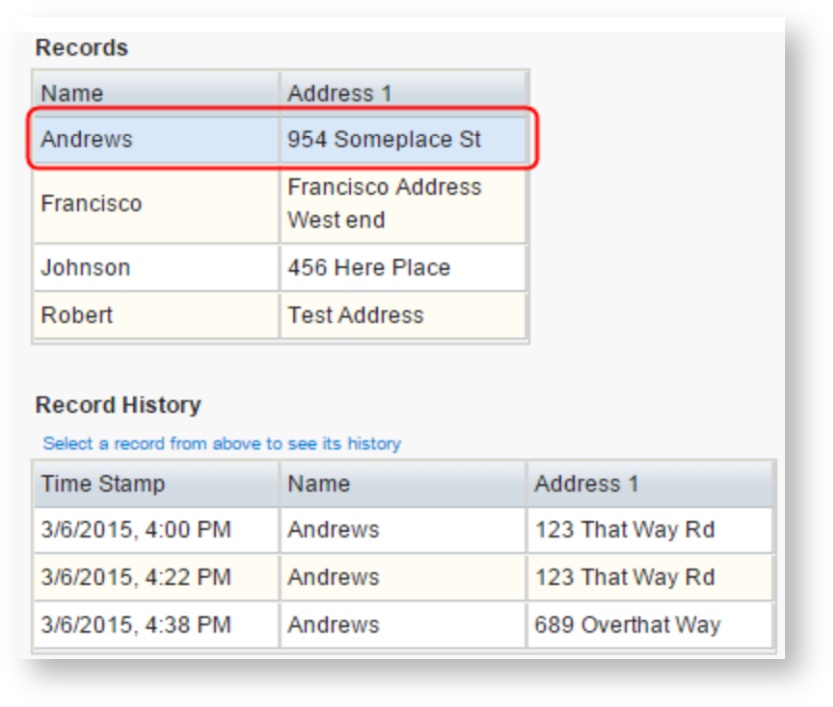
Now let's update these records to see the record tracking in action. Click on the “Andrews” row in the Records table. The record's details will appear in the Create New/Update Record section. Update a few of the fields and click Create / Update.
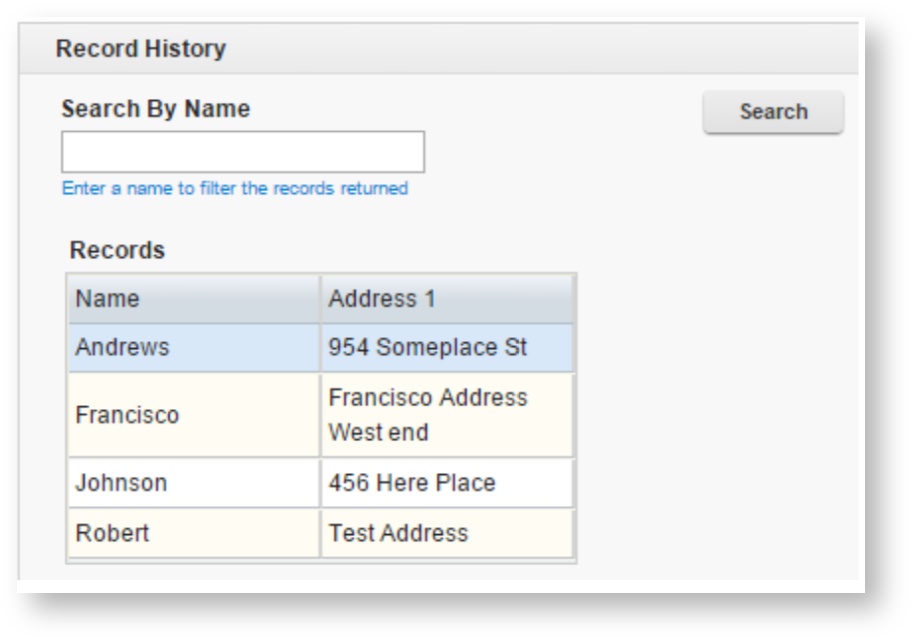
Now the Record History table contains a record:
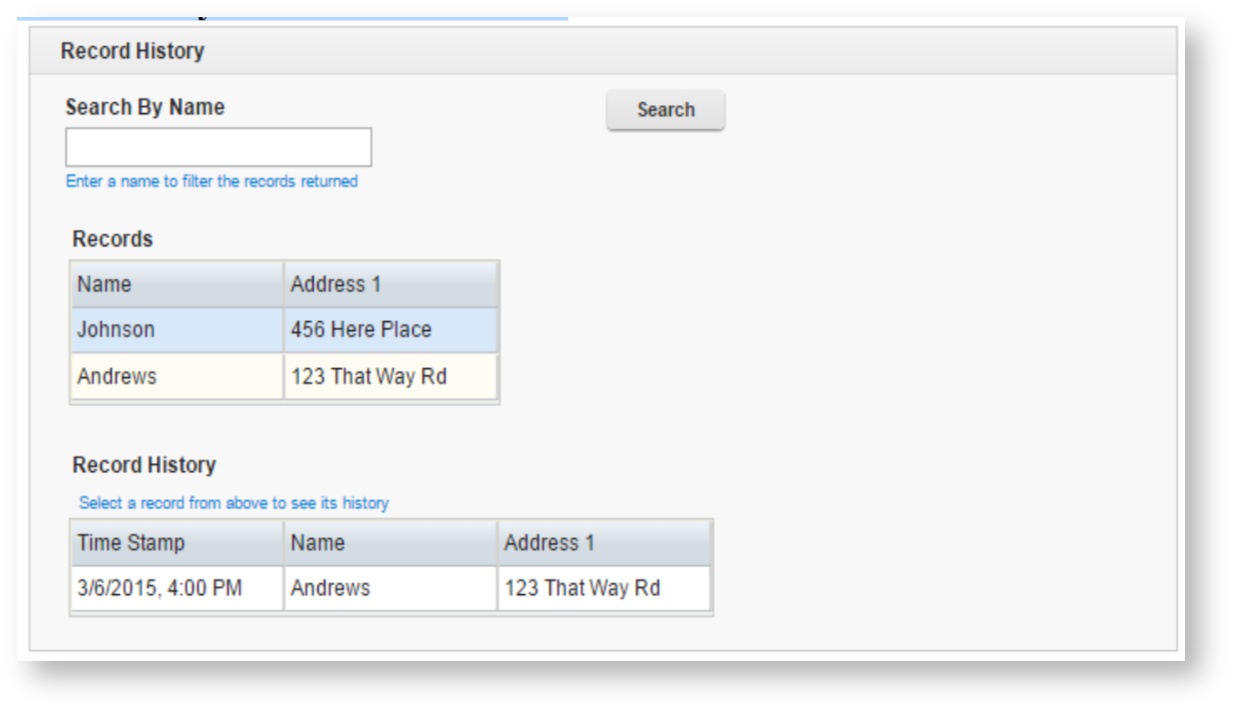
If you select the row in the Record History table then its details will appear in the Create New/Update Record section. Note that the fields are all inactive! This is by design as we don't want a user updating a historical record. There is also a new field, Last Updated, that shows the date the record was created.
If you click on the “Andrews” row in the Records table then it will re-load the “current” record. Now let's update the “Johnson” record. Click on that row in the Records table and then update its details.
You can also search for a specific “active” record by entering a name and clicking Search.
If you clear the Search field and Click Search then it will return all the “active” records. Now that we have covered how the form works you can add/modify additional records.
Note: Each user that accesses the form will only be able to see the entries that they enter, yet the users in the Administrator role can see all the data entered. This behavior could be changed based on your specific use case and is controlled on the Access tab while editing the application.
How the Application Works
Now let's get into the implementation details. The application is made up of two forms; there is the “UI” form that is the primary interface that users will interact with and the “Records” form that will store all the data.
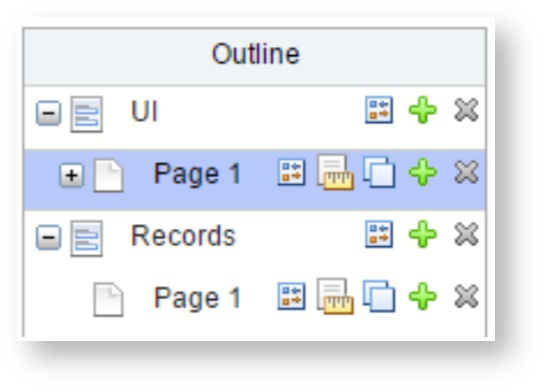
The UI form will never be submitted and so we want to hide the submit buttons on that page. To do that uncheck the “Display stage action buttons on this page” check box on the Advanced tab of the Page properties.
The Records form needs to have a few stages added before we start using it. On the Stages tab select the Records form. Add a stage and call it “Active” and add a second stage and call it “History”. The Start stage will have a button that submits to active and the Active stage will have a button that submits to History.
Create/Update a Record
The record creation is handled by a service. We are dynamically inserting a record into the “Records” table. Let's go through the logic here:
- If a user fills out the fields and clicks create then we need to first check to see if a record exists that matches the unique key (in this example that is the “Name” field).
- If the record does not exist then we create it using the Submit / Create service.
- If the record does exist then we move that record to the “History” stage and then Create a new record using the Submit / Create service.
In the onClick event of the Create / Update button we call the Service that checks if the record exists:
| Code Block | ||
|---|---|---|
| ||
//first check to see if there is a record with this ID
form.getServiceConfiguration("SC_CheckIfRecordExists").callService(); |
The service searches by the name in the Name field and returns true or false in to the RecordExists? Field.
In the onLoad event of the Form we have a “listener” to perform some work once that result is found:
| Code Block | ||
|---|---|---|
| ||
var srv_Chk = form.getServiceConfiguration('SC_CheckIfRecordExists'); srv_Chk.connectEvent("onCallFinished", function(success)
{
        if(success) {
         if(BO.F_SingleLine17.getValue() === "true") {
           //move the existing record to history
           form.getServiceConfiguration("SC_MoveToHistory").callService();
         } else {
           form.getServiceConfiguration("SC_CreateRecord").callService();
         }
} }); |
If the record was found we trigger the service that moves that record to the “History” stage.
Note that the service will only update a record that is in the “Active” stage and where it matches the name in the Name field. Then a new record is created by calling a similar service.
To insure that the create service is not called until the move has occurred we use another “listener”:
| Code Block | ||
|---|---|---|
| ||
var srv_MH = form.getServiceConfiguration('SC_MoveToHistory');
      srv_MH.connectEvent("onCallFinished", function(success)
      {
        if(success) {
          form.getServiceConfiguration("SC_CreateRecord").callService();
} }); |
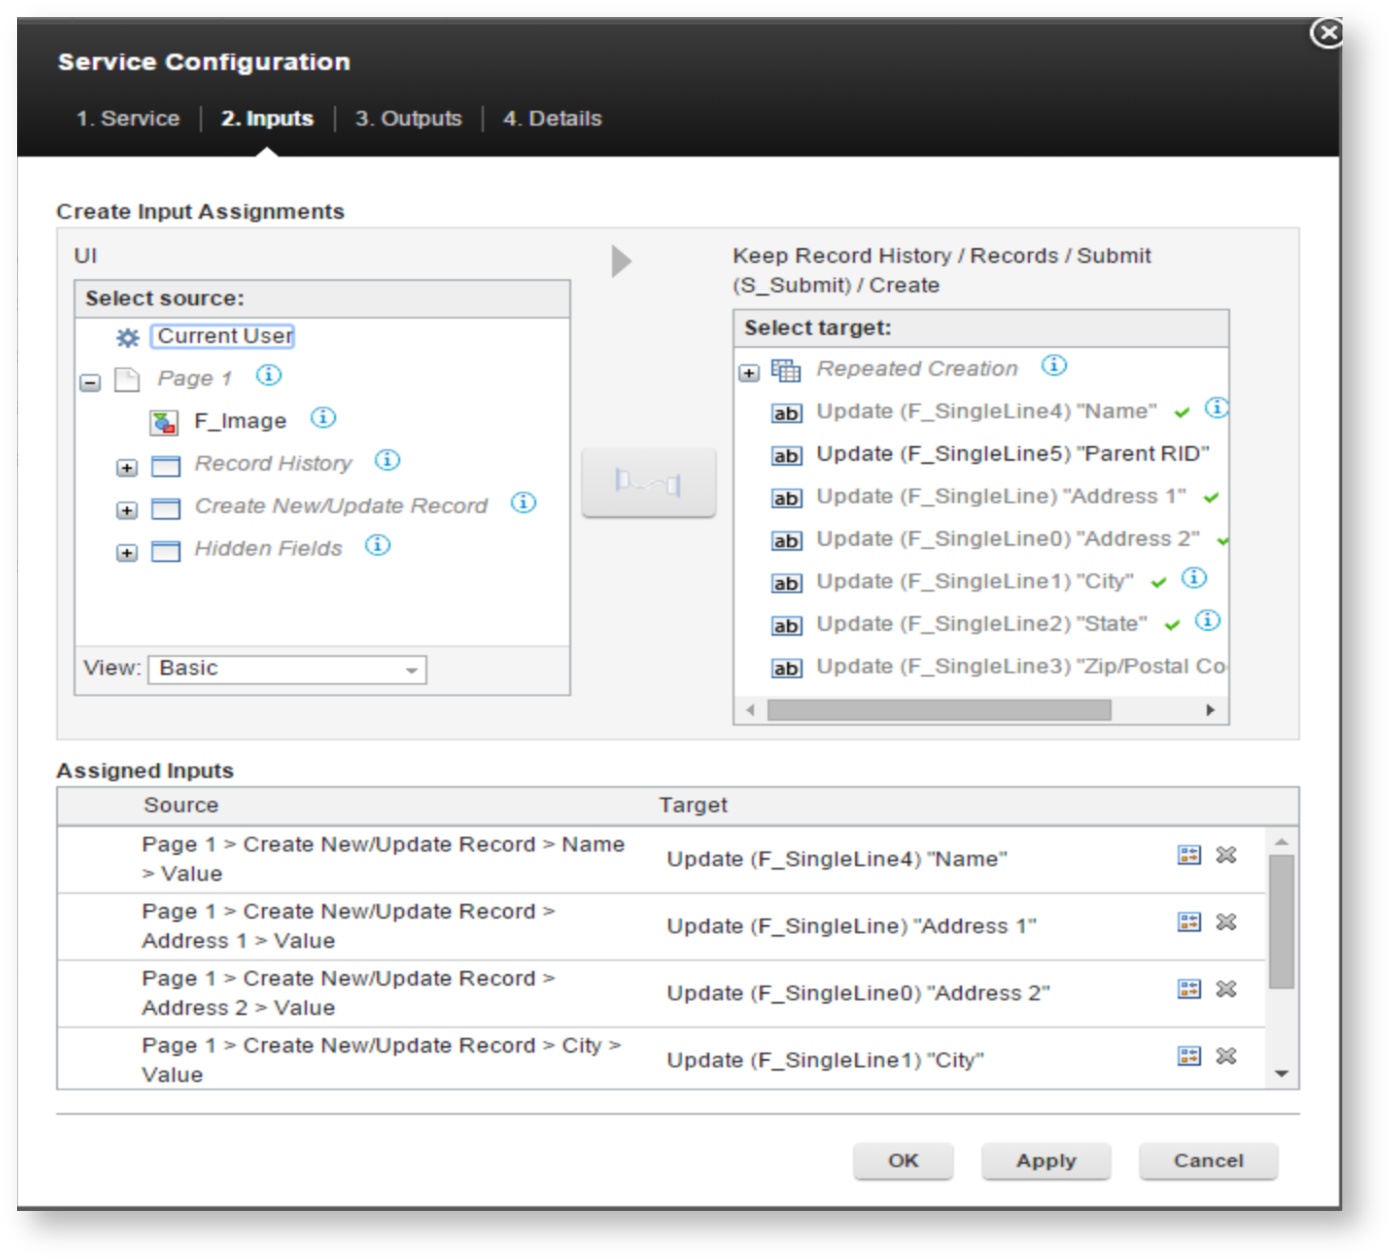
In the create service we are linking all the fields of the “Create New / Update Record” section to the corresponding fields in the “Records” form. When this service has completed there will be a new record in the “Active” stage that has all the data that was entered in the UI form.
Once the create is finished we have another “listener” to complete the whole transaction and clean up the UI. The listener:
- Clears out all the fields in the Create New / Update Record section
- Refreshes the Records table, by calling the search service
- If a row in the Records table is selected then it refreshes the Record History table by calling the search service.
| Code Block | ||
|---|---|---|
| ||
var srv_CR = form.getServiceConfiguration('SC_CreateRecord');
      srv_CR.connectEvent("onCallFinished", function(success)
      {
        if(success) {
         app.getSharedData().getItem(form.getPage('P_NewPage').F_Section0,
      app.getSharedData().clearItemValue);
         form.getServiceConfiguration("SC_GetActiveRecords").callService();
         if(form.getBO().F_ActiveSelRID.getValue() !== "") {
           form.getPage('P_NewPage').F_Table0.setSelection(-1);
           form.getServiceConfiguration("SC_GetHistoryForRec").callService();
         }
} }); |
Show Active Records / Filter By Name
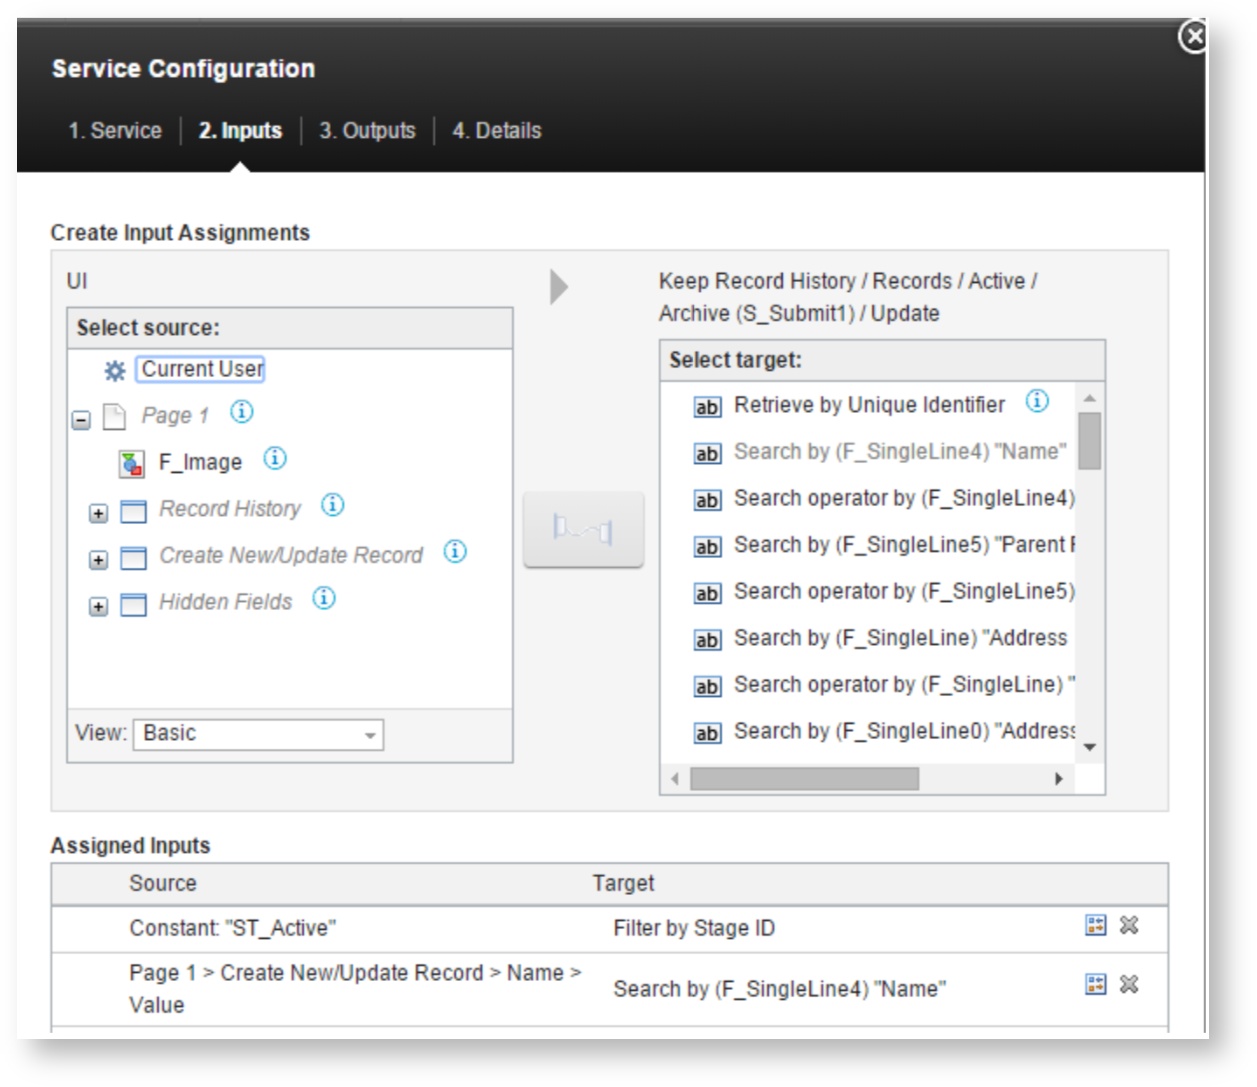
The “active” records are all the submitted forms that are in the “Active” stage. This is accomplished by calling a search service and mapping the results to a table.
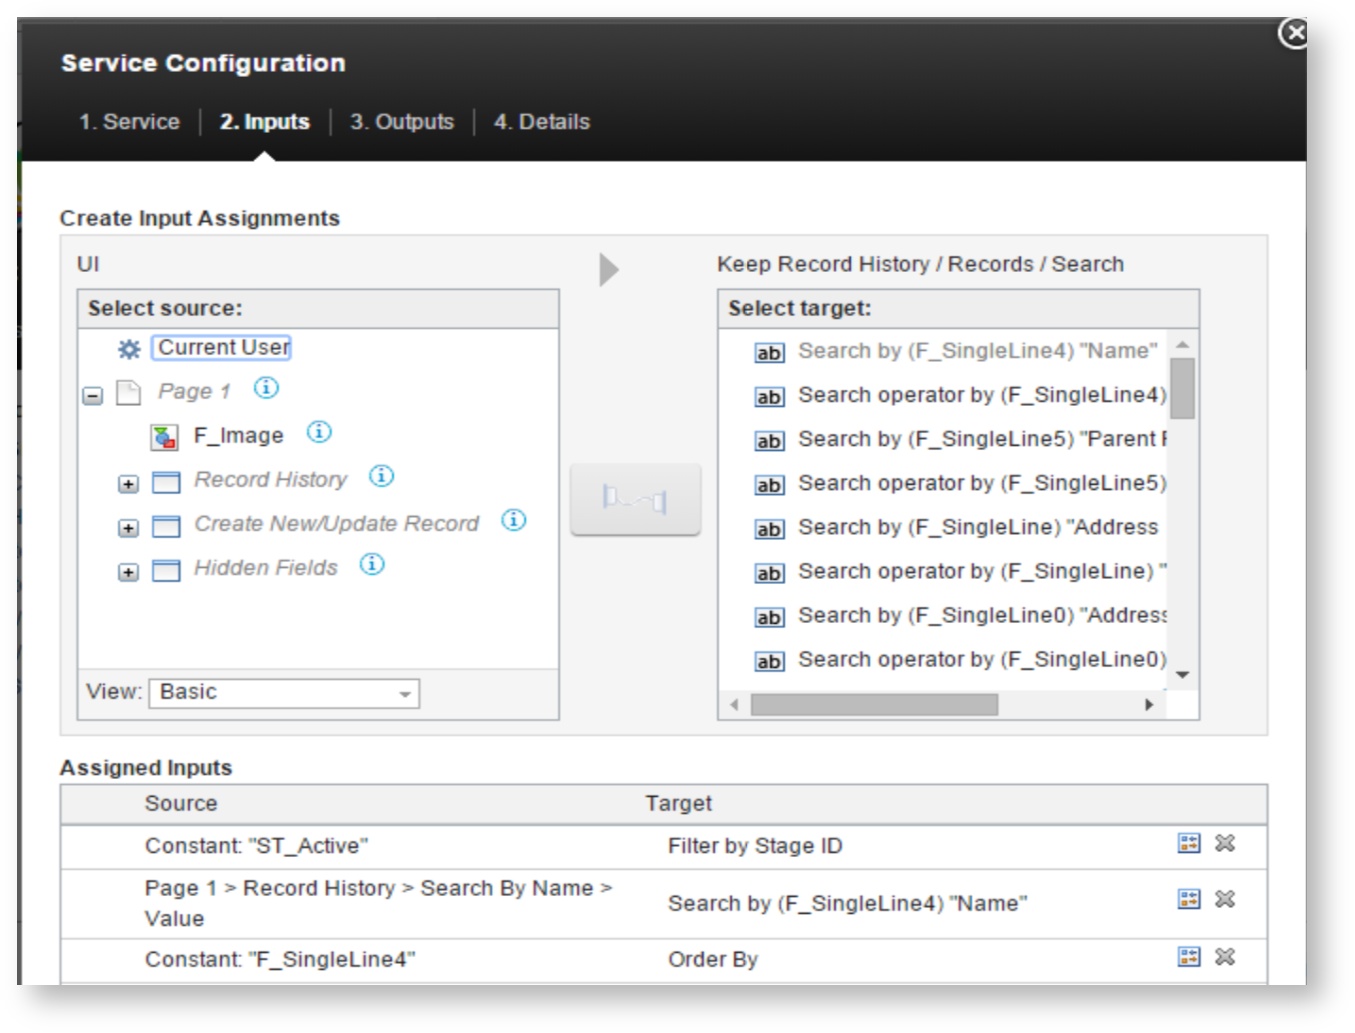
As you can see in the image, we search the Records table, filtering by the Active stage (which is denoted by its ID). We also provide the Name field as a search criteria (in case you want to give the user search capabilities). Finally we order the results by the Name field to keep it alphabetized.
I have hidden the action buttons of the table (Add, Edit, Remove) so that it cannot be directly edited by adding the following in the onShow event of the table:
| Code Block | ||
|---|---|---|
| ||
item.showAdd(false);
item.showEdit(false);
item.showRemove(false); |
I also call the search service in the onShow event so that as soon as the form is loaded the table will populate with the active records that the logged in user has authority to access.
Show Record History
Showing the record history is also controlled by a service, but this time we pull the records from the “History” stage. Note that the Record History table is populated only once a user selects a row in the Records table. You could enhance this application even further by making the table invisible until a selection is made.
To implement this behavior we need a control field that will be hidden from the user, Selected Active RID. When the user selects a row in the Records table we just javascript to extract the record id from that row and place it in the hidden field. The purpose of using a field is so that we can use that in the service to get the history records.
In the onClick event of the Records table we see the following code:
| Code Block | ||
|---|---|---|
| ||
//set the RID of the record table to populate the history table if(item.getSelection() !== null) {
        BO.F_SelHistoryRID.setValue("");
        page.F_Table0.setSelection(-1); //clear history table selection
        BO.F_ActiveSelRID.setValue("");
        BO.F_ActiveSelKey.setValue("");
        BO.F_ActiveSelRID.setValue(item.getSelection().F_ActiveRID.getValue());
        BO.F_ActiveSelKey.setValue(item.getSelection().F_ActiveName.getValue());
      app.getSharedData().getItem(page.F_Section0,
      app.getSharedData().setItemActive);
} |
This code:
- Clears the Selected History Record field
- Clears the selection from the Record History table if a row is currently selected
- Clears the Selected Active RID and Selected Active Key fields
- Sets the Selected Active RID and Selected Active Key fields with the values from the selected row - Sets all the fields in the Create New / Update Record section to Active
Get Record Detail For Review/Update
When Selected Active Key field is set the following code in the onItemChange event calls a Retrieve service to get that records detail:
| Code Block | ||
|---|---|---|
| ||
if(BOA.getValue() !== "") {
        form.getServiceConfiguration("SC_GetHistoryForRec").callService();
} |
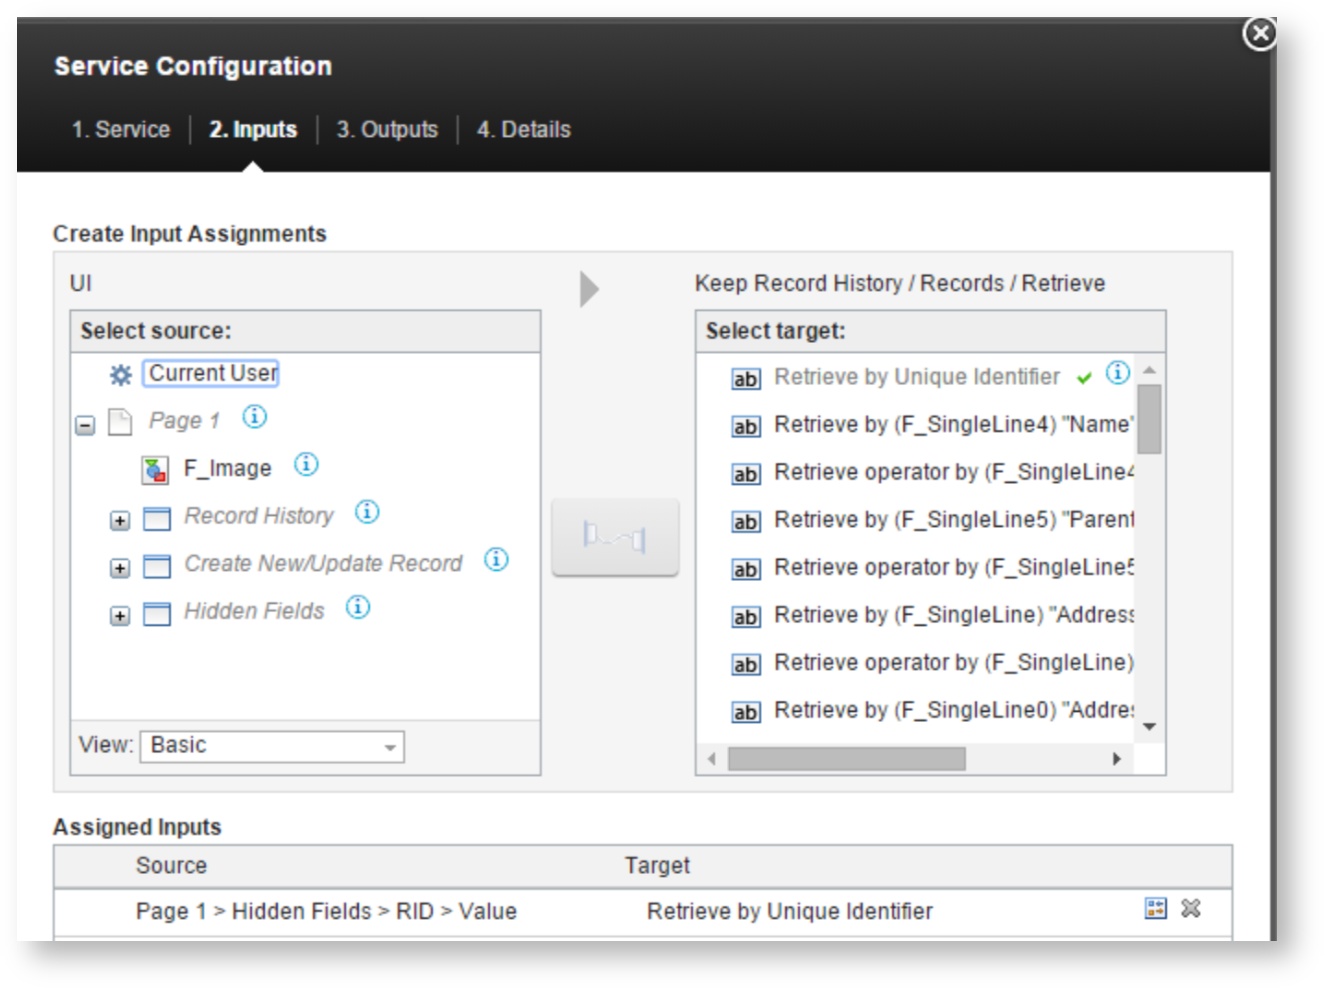
The Retrieve service will return the record that exactly matches the Unique Identifier that is in the Selected Active RID field. All of the fields are then mapped to the fields in the Create New / Update Record section.
In this specific use case that I implemented I did not was a user to be able to edit any of the fields of an archived record, so once the Retrieve service completes I use a “listener” to set all the fields in the section to inactive:
| Code Block | ||
|---|---|---|
| ||
var srv_GHRD = form.getServiceConfiguration('SC_GetHistoryRecDetails');
      srv_GHRD.connectEvent("onCallFinished", function(success)
      {
        if(success) {
         //make the section and all its children inactive
         if(form.getBO().F_SelHistoryRID.getValue() !== "") {
           app.getSharedData().getItem(form.getPage('P_NewPage').F_Section0,
      app.getSharedData().setItemInActive);
} }
}); |
You will also notice that the timestamp of that record appears. This is controlled by javascript in the onItemChange event of the Selected History Record:
| Code Block | ||
|---|---|---|
| ||
if(BOA.getValue() !== "") {
        form.getPage('P_NewPage').F_Timestamp0.setVisible(true);
} else {
        form.getPage('P_NewPage').F_Timestamp0.setVisible(false);
} |
The reason that we have to use javaScript here instead of a rule is because we are already using javaScript to change the “active” state of all the fields in the Create New / Update Record section and you cannot use the javaScript functions (setActive, setVisible, setRequired) on any objects that are also used in a Rule.
Modifying This Example
If this is the kind of feature that you would like to provide in your application then you can use this as a starting template! Let's look at what you would need to change:
- You need to understand/define what will be your unique key. In this app that is the Name field, but you can use whatever you need to for your use case. Where the Name field is referenced you will need to replace it with you own unqiue key.
- You will have to modify the Records table to contain all the fields that you want to store for your use case.
- You will need to modify the UI form in the Create New / Update Record section to have all the same fields that you created in the Records form.
- You will need to modify the Records and Records History tables to show the most noticeable fields for the user to recognize what they might want to view/modify.
You will have to modify all of the services and a bit of the javascript if you are changing field titles/ids, specifically in the table onClick events.