Understanding the Rules Dialog
The content that follows provides several different examples of using the Rules Wizard to create dynamic form behavior. The sample form has also been provided, click the paper clip at the top of the page to access and download it.
Rules Dialog Breakdown
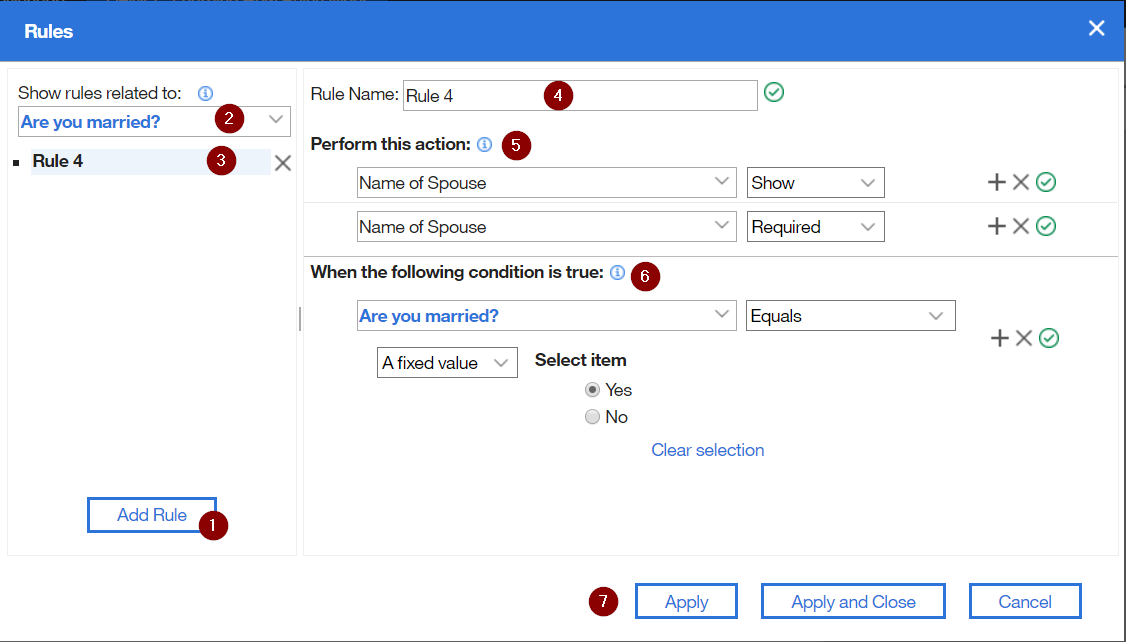
- If you want to add a new rule you must first click the Add Rule button. When the wizard loads it will default to the first rule in the list and if you make changes then you are changing that rule!
- All the rules in the form will be listed in the dropdown. When you select an item in the Show Related dropdown then all the rules that reference or affect this item will be denoted by the symbol in the diagram.
- Each rule related to the selected item will appear below the dropdown. Click the rule to see its content appear on the right side of the dialog. A rule can be deleted by clicking the “x”.
- The rule may be given a custom name by entering it into the Rule Name field
Each Rule can perform multiple actions; hide/show, enable/disable, required/not required, valid/not valid.
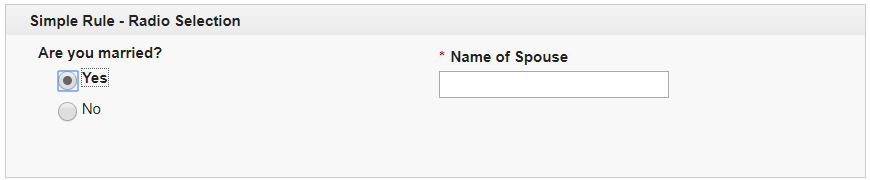
When you define an action then the inverse is also true. For example in the above screenshot, if married equals “yes” then name of spouse will be shown which also means if married is “no” or not selected then name of spouse will be hidden.
- Every rule has a condition that must be met.
- The first dropdown contains all the form fields that can be used in a condition. If the item you want to use is on a different page, select "Show items on all pages" and then find the item.
- The second dropdown contains the valid operators which change depending on the datatype of the item you select in the first dropdown.
- The third dropdown changes the reference from a fixed value to the value of another item in the form.
- You may add more conditions by clicking the “+”
- You may only have one type of relationship between the conditions (either “AND” or “OR”)
Apply will create the rule but leave the dialog open, Apply and Close will create the rule and close the dialog, and Cancel will close the dialog and it will not keep any changes made since the last time “Apply” was clicked or the dialog was opened.
If you navigate to a different rule, before applying your changes you will see a dialog.

If you click “Apply Changes” then your rule modifications will be saved. If you click “Discard Changes” then any changes made will be thrown away. If you click “Cancel” then the attempt to navigate away from the current rule will be canceled.
As you create rules it is important to remember that rules can affect each other and in some cases completely counteract what you have defined. You should never refer to the same item in the “Perform this action” section for multiple rules. The general rule here is that if there are conflicts then the “last” rule wins.
Rule Operators
The operator defines how the operands will be evaluated. The available operators will change based on the items referenced within the rule. All the operators are defined below.
| Operator | Description |
|---|---|
| After | Returns true if the date specified is “after” the exact value or the value of the other form item specified. |
| Before | Returns true if the date specified is “before” the exact value or the value of the other form item specified. |
Between | Checks if the value of the selected field falls alphabetically between either two fixed values or other form items. i.e. “Red” is between “Green” and “Yellow” because “R” is between “G” and “Y” in the alphabet. Case matters here, as the string is evaluated against the alphabet by first scanning the uppercase letters (A-Z) and then the lowercase (a-z). For example if you specified between “Green” and “brown”, then “Red” would be valid but “red” would not, because the alphabet range would be A-Z + a-b. |
Contains | Does the specified string contain the fixed value or other field value. This function recognizes case. |
| Day is | Compares the day of the date specified with an exact value or the value of another item. |
| Does not equal | |
| Does not include | |
Ends With | Does the specified string end with the fixed value or other field value. This function recognizes case. |
Equals | Does the specified string equal the fixed value or other field value. Case matters, “c” does not equal “C”. |
Follows | Does the specified string come after the fixed value or other field value in the alphabet. i.e. “Red” follows “Green”. This function recognizes case. |
| Includes | |
Matches | Does the specified string match after the fixed value or other field value. Similar to contains, it is true if the specified string can be found anywhere in the value. This function recognizes case. |
| Month is | Compares the month of the date specified with an exact value or the value of another item. |
Precedes | Does the specified string come before the fixed value or other field value in the alphabet. i.e. “Red” precedes “Yellow”. This function recognizes case. |
Starts with | Does the specified string start with the fixed value or other field value. This function recognizes case. |
| Has value | |
| Has no value | |
| Year is | Compares the year of the date specified with an exact value or the value of another item. |
Number/Currency Fields Operators
- Between
- Does not equal
- Equals
- Greater than
- Greater than or equals
- Less than
- Less than or equals
Single Line / Email / Multi-Line Operators
- Between
- Contains
- Ends with
- Equals
- Follows
- Matches
- Precedes
- Starts with
- Has value
- Has no value
Select One / Checkbox / Dropdown Operators
- Equals
- Does not equal
- Has value
- Has no value
Select Many Operators
- Matches
- Does not match
- Includes
- Does not include
- Has value
- Has no value
Time / Timestamp Operators
- After
- Before
- Between
- Has value
- Has no value
Date Operators
- After
- Before
- Between
- Day is
- Equals
- Has value
- Has no value
- Month is
- Year is
Rule Actions
| Action | Description |
|---|---|
Show | Shows the specified fields |
Hide | Hides the specified fields |
Enable | Enables the specified fields |
Disable | Disables the specified fields, they will appear as light gray and cannot be interacted with. |
Valid | Sets the field to valid. |
Not Valid | Sets the field to invalid, a red message will appear under the field and a exclamation will appear before the field label. |
Required | Sets the field to required. The form will not submit unless the value is entered. User will receive a warning if they try to navigate to a different page without filling in the value. |
Not Required | Sets the field to not required (optional). |
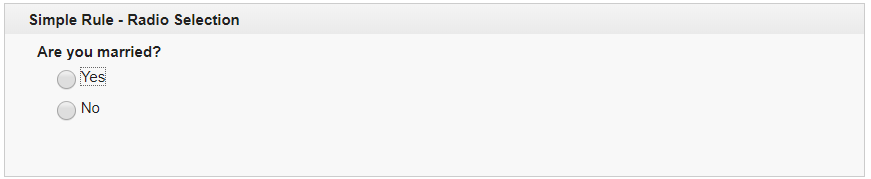
Simple Rule 1 - Radio Selection
This rule will make the Name of Spouse field visible and required if the user selects “Yes” to the Are you married question.
When you first render the form the Name of Spouse field is not shown:
When you select Yes the Name of Spouse field appears and becomes required:
Simple Rule 2 – Numeric Comparisons
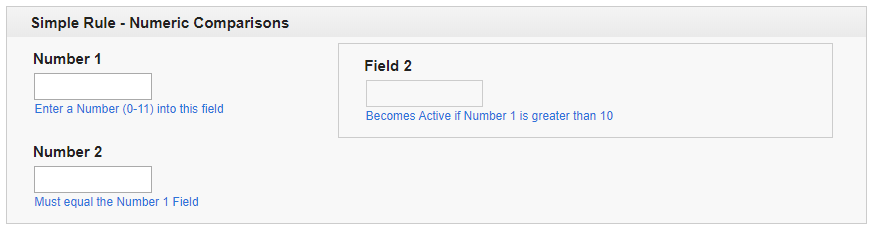
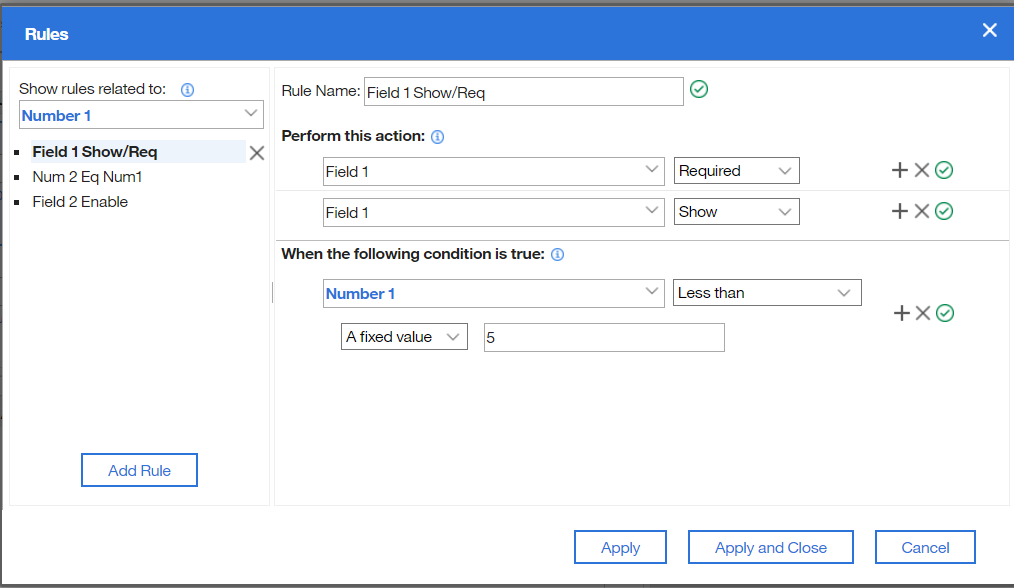
We will look at a few different rules in this section. The first rule will cause Field 1 to be shown and set to required:
The second rule will cause Field 2 to be enabled for user input:
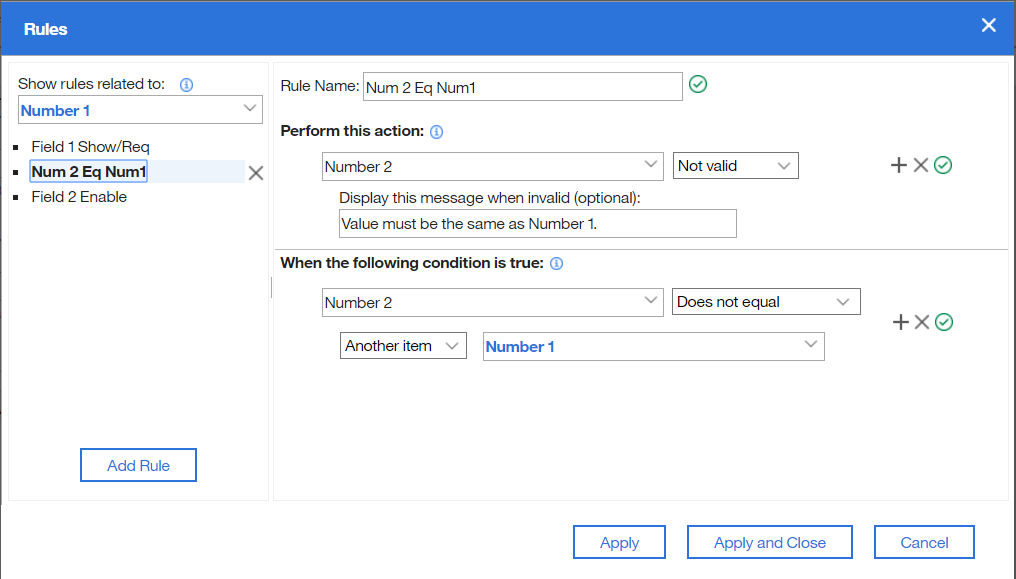
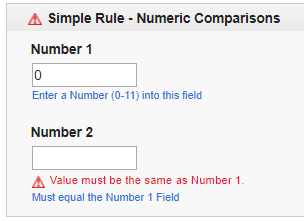
The third rule will set Number 2 to invalid if its value does not match what is entered in Number 1:

Note that this rule uses the “Another item” selection that allows you to compare one field to another on the same form. In the “Perform this action” section you can also see that we can set the field to invalid and set the message that will be displayed when the condition is met:
Rule with an AND Condition
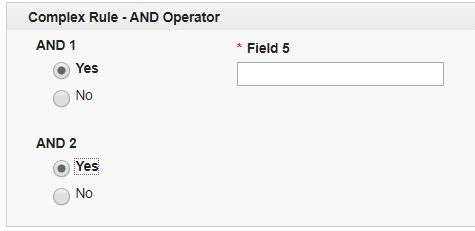
In this section we look at creating a rule where two fields are part of the condition. If the value of both AND 1 and AND 2 is “Yes” then show Field 5.
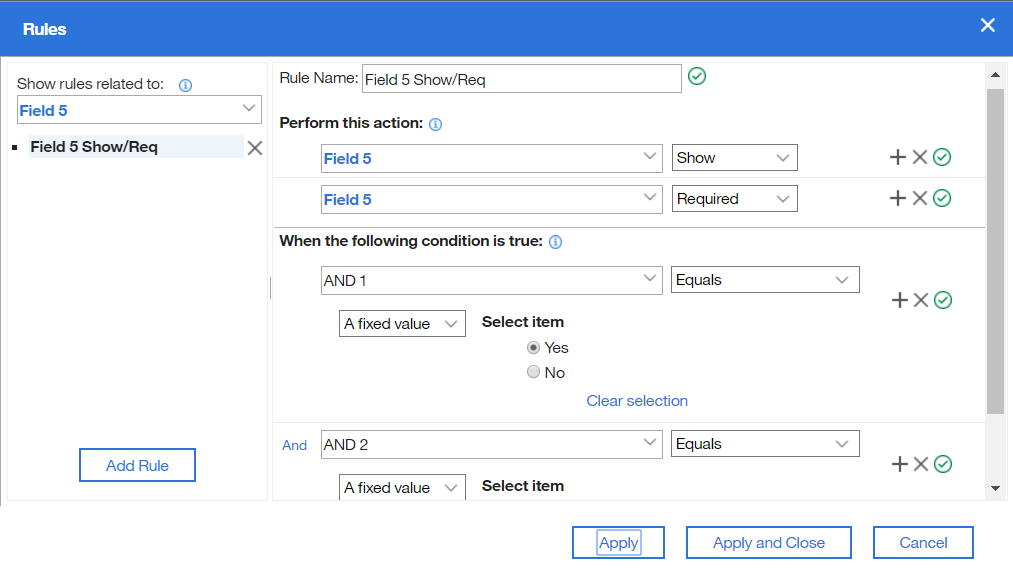
Note that you can only have ONE relationship (between the conditions) when you have more than one field in the condition. If you need to have more complicated logic then you will have to refer to that section.
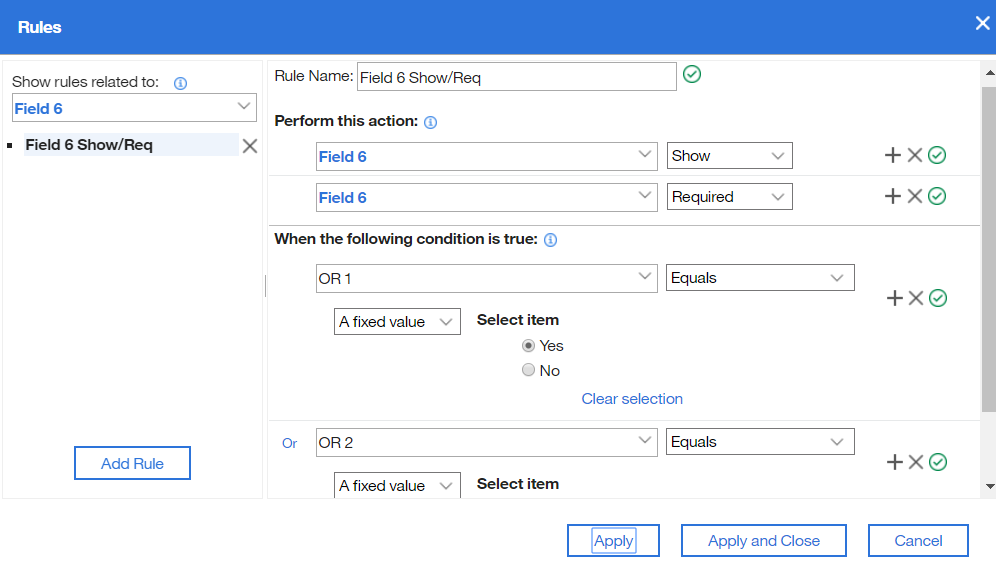
Rule with an OR Condition

In this section we look at creating a rule where two fields are part of the condition. If OR 1 or OR 2 equal “Yes” then we will show Field 6 and make it required.
How to Handle More Complicated Logic
The Rules wizard does have its limitations and you may find that you have certain scenarios where you need additional flexibility. You can create your own customized behavior by using JavaScript. Let's review what that might look like.
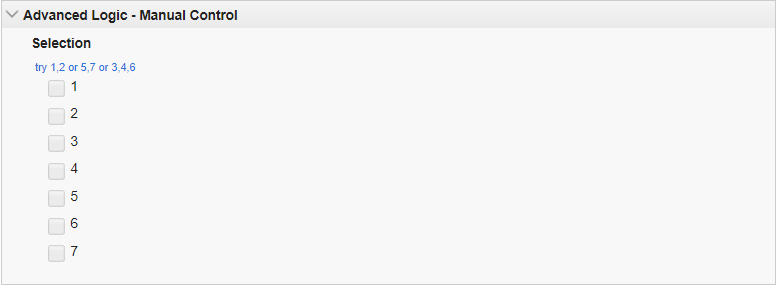
Let's say that we want to establish a rule where a field will only appear if ONLY 1 and 2 are selected or ONLY 5 and 7 are selected (but not both). I would write a JavaScript function like this:
app.getSharedData().showField1 = function() {
  var v = BO.F_SelectMany.getValue();
  if( (v === "1__#__2") || (v === "5__#__7")) {
    form.getPage('P_NewPage').F_SingleLine4.setVisible(true);
  } else {
    form.getPage('P_NewPage').F_SingleLine4.setVisible(false);
  }
}
Within JavaScript we can create any complex comparison. There are a few things that you need to know to get started creating your own logic:
- The AND operator in JavaScript is &&
- The OR Operator in JavaScript is ||
- The value of a Checklist is a list of the selected items separated by “__#__” (that is underscore underscore number sign underscore underscore).
- You can affect an item's behavior by using the functions; setVisible(), setRequired(), setActive(). In all cases you pass either true or false.
To use this function, I add the following to the Form onLoad event as well as the onItemChange event of the item that the user interacts with (in this case it is the Checklist):
app.getSharedData().showField1();
The purpose for calling this function in multiple places is that we need to make sure that we evaluate the state of the field when the form loads and again when the conditional item changes.
Here you see the function in action:
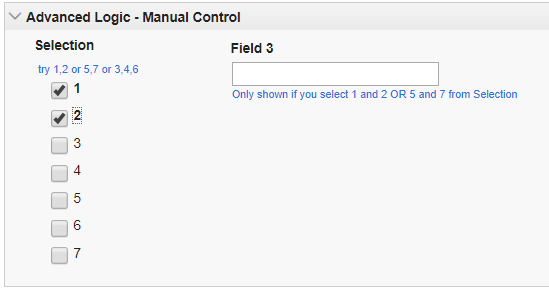
Let's say you want to have 1 and 2 or 5 and 7 (where all 4 selected is also valid), then you would modify the function to:
app.getSharedData().showField1 = function() {
  var v = BO.F_SelectMany.getValue();
  if((v.indexOf("1") !== -1 && v.indexOf("2") !== -1) || (v.indexOf("5") !== -1 && v.indexOf("7") !== -1)) {
    form.getPage('P_NewPage').F_SingleLine4.setVisible(true);
  } else {
    form.getPage('P_NewPage').F_SingleLine4.setVisible(false);
  }
}
Let's look at another complex rule.
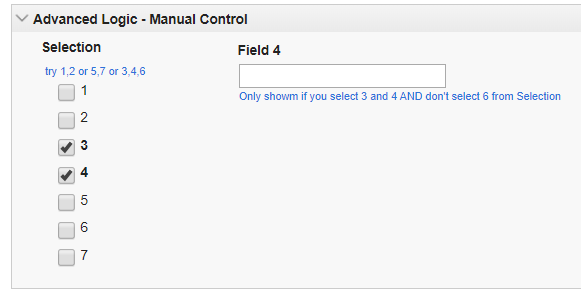
For this one, we will only show Field 4 if the user selects 3 and 4 and not 6. The function looks like:
app.getSharedData().showField2 = function() {
  var v = BO.F_SelectMany.getValue();
  if( (v.search("3") !== -1 && v.search("4") !== -1) && (v.search("6") === -1)) {
    form.getPage('P_NewPage').F_SingleLine5.setVisible(true);
  } else {
    form.getPage('P_NewPage').F_SingleLine5.setVisible(false);
  }
}
Now that we have demonstrated several different ways of creating rules within an application you should be well equipped to start creating dynamic behavior in your forms.
Clearing Field Values
If you have fields whose visibility is changed by a rule then you may need to add some code to clear the values when the field is invisible. If a user enter's a value and then changes their selection they will be submitted, which can cause you to collect invalid information. I like to use a function like the following to clear all the fields. Place the function in the form's onLoad event:
/*
* Clears all the fields defined in the fieldsToClear list when the conditionalItem's value is equals to the conditionToClear
*
* conditionalItem - the business object of the item that triggers the condition
* conditionToClear - the string value that the conditional item's value must equal
* fieldsToClear - Array of field id's whose values must be cleared when the condition is true
*
* Usage:
*   var itemsToClear = ["F_SpouseName","F_SpouseBirthDate"];
*   app.getSharedData().clearField(item, "No", itemsToClear);
*/
app.getSharedData().clearField = function(conditionalItem, conditionToClear, fieldsToClear) {
   if(typeof conditionalItem === "undefined") {
     return;
   }

	if(conditionalItem.getValue() === conditionToClear) {
            for(var tmpItem in fieldsToClear) {
               var fieldBO = get(BO,get(fieldsToClear, tmpItem));
		if(typeof fieldBO !== 'undefined') {
		     fieldBO.setValue('');
		}
            }
	}
}
Then in the field that is the condition of the rule, add something like the following in the onItemChange event:
var itemsToClear = ["F_SpouseName","F_SpouseBirthDate"];
app.getSharedData().clearField(item, "No", itemsToClear);
Add all the field ids to the itemsToClear list that you want to clear.