LDAP Service Configuration
Introduction
The corporate enterprise directory, or LDAP, is the most common target of integration with HCL Leap. HCL has provided a transport and a few sample service descriptions that can be used to perform this integration.
A Transport is an OSGI bundle, written in Java, that implements HCL Leap extension points. Service Descriptions are XML files that define the inputs and outputs that are used by the transport. To discover more about implementing your own Transports reference our documentation.
When the transport and associated service description XML files are deployed, then application designers can setup their applications to auto-populate user information. This document describes how to configure and deploy all the artifacts necessary to enable applications to communicate with LDAP.
System Configuration
Leap is a web application that runs on WebSphere. All of Leap's access is controlled by WebSphere through a federated repository that is setup in the Global Security section of the WebSphere Administrative Console. You can read more about how to configure Leap and federated repositories in the IBM WebSphere Knowledge Center
Provide LDAP Services for Form Design
Many of the workflow features can be used with your corporate LDAP, for example:
- pre-populating information about the current user
- retrieving the current user's manager
- retrieving the managers list of employees
All of these functions and more can be implemented within your Leap environment by creating an LDAP Transport. The Leap Knowledge Center provides a starting point for the LDAP Transport. In order to enable LDAP type queries in your Leap apps you have to do 2 things:
- Deploy the CustomLDAPTransport jar file into your extensions directory.
- Deploy the Service Configuration XML files that represent the different LDAP services that you want to offer to your Leap designers.
The custom transport supports all 3 of the credential providers that Leap offers, you can read more about the providers and their features in the Knowledge Center. Note: The Credential providers are not supported on WAS liberty.
The jar file that has been provided can be used as-is, but the expectation is that you will have someone that can setup a Java Development IDE so that they can build and modify the transport code if you need additional functionality that has not already been provided.
CustomLDAPServiceTransport.jar
Transport Parameters
| Type | Name | Description |
| Input | url | The URL to the LDAP |
| Input | basedn | The basedn to use |
| Input | filter | The LDAP filter to use for the search. For example: <constant>
<id>filter</id>
<value>(& (objectClass=person)(managerSerialNumber={0}*)(managerCountryCode={1}*))</value>
</constant>
|
| Input | filter-arg-x | For every search parameter in the filter this defines what will be used for the search. For example: <mapping target="transport:filter-arg-0" source="parameter:searchSerialNumber" /> <mapping target="transport:filter-arg-1" source="parameter:searchCountryCode" /> These mapping statements will substitute the "0" in the LDAP filter with the value of the searchSerialNumber value passed to the service and "1" with the value of the searchCountryCode value passed to the service. |
| Input | result-attributes | Comma separated list of the LDAP attributes to return in the search results. If unspecified then all attributes are returned. |
| Input | result-count | Limits the number of records returned from LDAP. If unspecified the default is 50. |
| Input | sub-filter | A secondary LDAP query to execute for each record of the first result set. |
| Input | sub-filter-arg-x | Value should start with "result-attribute:" to reference an attribute from the first result set, this will be used to replace the integers in the filter. <constant> <!-- OPTIONAL: The filter variables must be specified in this format "result-attribute:<name-of-ldap-attribute>" the "result-attribute" value tells the transport to pull the attribute from the parent result set. --> <id>sub-filter-arg-0</id> <value>result-attribute:hrOrganizationCode</value> </constant> |
| Input | sub-result-attributes | Comma separated list of the LDAP attributes to return in the search results. If unspecified then all attributes are returned. |
| Input | sub-result-count | Limits the number of records returned from LDAP. If unspecified the default is 50. |
| Input | return-multiple-attr | If true, then all attributes will be returned including those with multiple values. If false then only the first attribute will be returned. Valid values are true or false. Default is false. |
| Input | bind-user | The username required to connect to the LDAP. Required if using this transport with WAS Liberty. |
| Input | bind-password | The password required to connect to the LDAP. Required if using this transport with WAS Liberty. |
| Output | resultXML | The XML containing the LDAP search results. <searchresults> <searchresult> <ldapattrribute1/> <ldapattrribute2/> <subsearchresults> <subsearchresult> <ldapattrribute1/> <ldapattrribute2/> </subsearchresult> </subsearchresults> </searchresult> </searchresults> Note: "ldapattributex" will need to be replaced with the actual attributes in your LDAP. |
Deploying the Transport
The transport is a .jar file that must be deployed into the file structure for HCL LEAP. All extensions are placed into the extensions directory. The default location is /opt/HCL/Leap/extensions or C:\HCL\Leap\extensions. You can discover more by referring to our documentation.
Once the jar file has been placed in the extensions directory you will see a message written to the log file indicating that it has been loaded and is ready for consumption:
[6/11/18 10:07:14:550 PST] 0000007a DirectoryWatc I com.ibm.form.platform.service.framework.DirectoryWatcher processArtifact FSPDI5: The Bundle, <ExtensionName>.jar loaded successfully
Configuring the Service Description
Creating a service description is a one-time action that once completed, provides the function to all HCL Leap application designers. Three service descriptions have been provided as examples of the kind of functionality that can be provided with an integration with LDAP. This document will use the most common service as the example.
- Download these XML files.
LDAPLookup_GetEmployee.xml - Returns ONE employee, that matches the search criteria (name, email, uid).
LDAPLookup_SearchEmployeesByName.xml - Returns a list of employees that match the search criteria
LDAPLookup_ManagerEmployees.xml
Setting up the Global Parameters
- Open the LDAPLookup_GetEmployee.xml in a text editor. Do not use Notepad or Wordpad, instead use a proper editor like NotePad++, UtraEdit, etc.
- The <id>, found on line 3, must be a unique value (not used by any other xml files deployed with Leap) as this is how the service is registered with Leap.
- The <transportId>, on line 6, must be set to CustomLDAPServiceTransport
- The <name>, on line 13, is the name of the service that will appear in the service configuration dialog within Leap, therefore insure it is something that your users can recognize.
- The <description>, on line 14, will appear in the service configuration dialog and should provide a clear description of what the service provides
Setting up the Inbound Parameters
- The <inbound> element is where all the parameters are defined that will be passed to the transport. In this example, there are three: searchName, searchEmail and searchUID. Each parameter follows the same format
<parameter> <id>searchName</id> <name xml:lang="en">Search Name</name> <description xml:lang="en">The employee name to search for.</description> <mandatory>false</mandatory> <type>STRING</type> </parameter>
- The <id> must be unique, and will be referenced in the inbound <servicemapping> section
- The <name> and <description> will appear in the dialog within Leap
- If <mandatory> is true, then the service cannot be saved without specifying this value.
- <type> defines the data being provided. The other types are documented, but in this case, all will be STRING.
Setting up the Constants
- Define the URL to the LDAP server on line 45.
- Define the baseDN that will be used for the LDAP queries on line 50.
Define the filter that will be used to define the LDAP queries on line 55.
<value>(&(objectClass=person)(cn={0}*)(emailAddress={1}*)(uid={2}*))</value>The 0,1 and 2 shown in this filter reference the input parameters defined at the start of the service description. In this case 0 is searchName, 1 is searchEmail and 2 is searchUID. When this filter is executed the numbers will be dynamically replaced with the value passed in from the Leap application calling the service.
- Define all the LDAP attributes, on line 61, that you want to be returned from the LDAP query. This is a comma-separated list. Note: For every attribute listed here you must create a corresponding parameter definition in the <outbound> section of the XML file.
- Define all the inbound mappings, lines 70-81. The inbound mappings connect the parameters and constants defined in the XML file to the transport parameters. The only mappings that you may have to modify are the filter-arg-x as your search parameters may differ.
Setting up the Outbound Parameters
You must define an outbound parameter for every attribute listed in the result-attributes. The outbound parameters all follow the same structure.
<parameter> <id>cn</id> <name xml:lang="en">Employee's Full Name</name> <description xml:lang="en"></description> <type>STRING</type> </parameter>
- The <id> must be unique, and will be referenced in the outbound <servicemapping> section.
- The <name> and <description> appear in the service dialog
- The type defines what is being returned.
All the parameters defined within the <outbound> section will appear in the service dialog on the Outputs tab.
For every outbound parameter, there must be a corresponding <mapping>. To properly configure the service mappings, you must understand what is being returned from the LDAP query. In this case, the LDAP will return XML that looks like:
<searchresults>
    <searchresult>
        <ldapattrribute1/>
        <ldapattrribute2/>
        <subsearchresults>
            <subsearchresult>
                <ldapattrribute1/>
                <ldapattrribute2/>
            </subsearchresult>
        </subsearchresults>
    </searchresult>
</searchresults>
Now that we know the structure we can create the mapping that places individual elements from the result and assigns them to the corresponding output parameters. Take the following mapping as an example:
<mapping source="transport:resultXML" target="parameter:cn" sourceRef="string(searchresults/searchresult[1]/cn)" sourceType="xml" />
This mapping assigns the “cn” value from the xml result to the “cn” parameter.
The sourceRef attribute enables the use of XPath to manipulate the XML that is returned from the service. This allows us to pull content out of the XML structure and assign it directly to an outbound parameter.
Once all the mappings are defined you are ready to deploy the service and start using it.
Deploying the Service Description
The XML files must be deployed to the ServiceCatalog/1 directory.
Once the xml file has been placed in the ServiceCatalog/1 directory you will see a message written to the log file indicating that is has been loaded and is ready for consumption:
[6/11/18 10:07:45:904 PST] 0000008a ServiceFileCa I com.ibm.form.nitro.service.services.impl.ServiceFileCatalogDirectory add Registering service description in C:\HCL\Leap\ServiceCatalog\1\<ServiceFileName>.xml.
If you do not see this message within 60 seconds, then starting and stopping the Leap application (not WebSphere) will also cause the file to be picked up. Note: If there is a syntax error in the XML file then you may also see a message in the log and the service will not appear in Leap.
Note: There are many more services that you could offer your users, but it will depend on the values of your LDAP and what functionality you want to make available. Hopefully these three examples demonstrate the basic concepts and you can apply them to any additional services you want to create.
I have created a more in-depth usage guide, which you may refer to if necessary. HCL Leap and Enterprise Directory.pdf
Testing your LDAP Service
If the ServiceCatalog/1 directory already existed (before the server was last restarted) then Leap will automatically detect (it takes about 60 seconds) the new XML file and add it to your Services Catalog, otherwise you will need to restart the application (from the WebSphere console).
Now that the service is deployed you can begin using it within your applications.
- Edit an application.
- Click on the Settings tab.
- Under Services, on the left-side, click one of the forms.
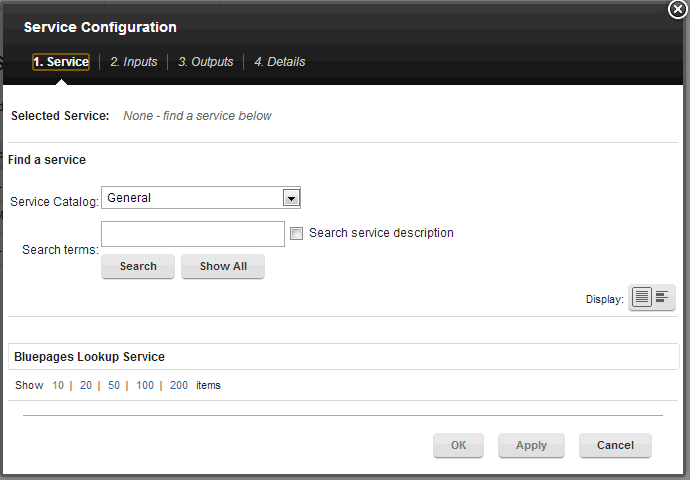
- Click Add Service Configuration.
- Select “Or, select a service”
- Set the Service Catalog to General.
Locate and click on the service in the list below
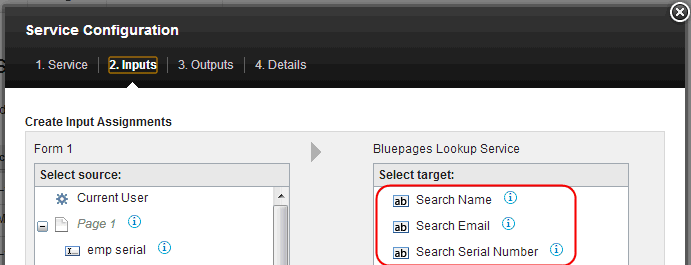
The Inputs (or search criteria) for the LDAP query will appear as you defined them in the XML file. Decide how you want to perform the employee lookup. Will it be based on the current user? Or will the user of the form be entering some key information (like email address or uid) to then load details about that person? In this example, I want to automatically load the name of the current user. Click Current User and then connect it to the appropriate search parameter. In my implementation of Leap user’s login with their email address, therefore I would connect the Current User with the Search Email.
Select an input from your form (on the left side), then select the corresponding input parameters (on the right side) and click the link button in the middle to create a binding.
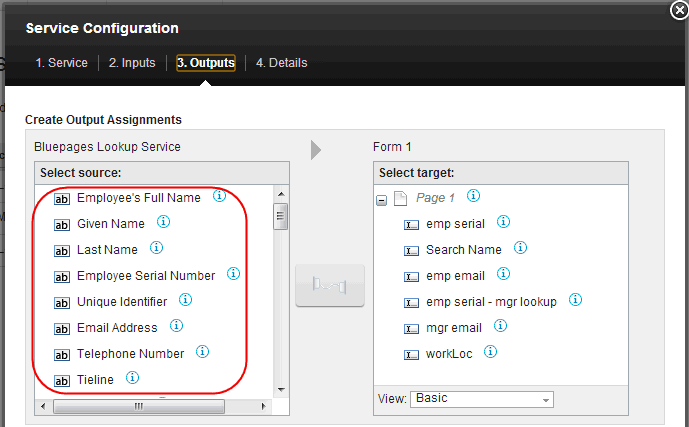
The Outputs (or values that will be returned) by the LDAP query will also appear as you defined them:
Select an output from the service result (on the left side), then select the corresponding field on your form (on the right side) where you want the value to be placed and click the link button in the middle to create a binding.
Click OK to complete the service configuration setup.
Now you need to setup when this service will be called. For example, you might want to call it in the onItemChange of an email field to validate the email address that a user provides against the company LDAP. Select the properties for the email field and click on the Events tab, check the Call a Service check box and then select the service that you created from the list.
Launch your form and test out the service.
Troubleshooting your Service Description
If the service that you created does not work then you may need to troubleshoot to determine the cause. Some common errors are:
- You may have a syntactical error in your XML file causing your service to not appear in the list of available services
- You may have an error in the mapping definition of inputs or outputs causing nothing to happen when the service executes (but it is visible in the list of services).
1. Enable the Leap tracing. Within WebSphere Application Server add the trace string "com.ibm.support.examples.*=finest", then inspect the SystemOut.log and trace.log that gets created to see what it may be saying about the situation. The log file will tell you if the xml file was loaded successfully and usually will give a brief explanation if it was not.
The trace also contains detailed information about the input and out parameters that it processed during the service execution:
[12/13/13 17:45:47:806 PST] 00000023 ServicesServi 3 com.ibm.form.nitro.service.services.impl.ServicesService invoke Inbound service data is: {'metadata':null,'payload':{'emailAddress':'cdawes@ca.ibm.com'}}
[12/13/13 17:45:47:829 PST] 00000023 ServicesServi 3 com.ibm.form.nitro.service.services.impl.ServicesService invoke Outbound service data is: {'cn':'Christopher Dawes'}
It will also indicate when it has refreshed the contents of the files (in case you are making changes and wondering when they have been applied):
[12/5/13 23:13:44:503 PST] 00000019 ServiceFileCa 1 com.ibm.form.nitro.service.services.impl.ServiceFileCatalog refresh Refreshing service descriptions in C:\IBM\Forms\ServiceCatalog\1. [12/5/13 23:13:44:519 PST] 00000019 ServiceFileCa 1 com.ibm.form.nitro.service.services.impl.ServiceFileCatalog refresh Finished refreshing service descriptions in C:\IBM\Forms\ServiceCatalog\1.
Creating Your Own Version of the LDAP Transport (Optional)
If the provided version does not provide the desired functionality, then you may create your own. To build your own version of this transport so that you can make modifications you will need to:
1. Create a New OSGI Plugin Project, for example let's use the project name "MyLDAPServiceTransport".
2. Create a OSGI-INF folder and create an XML file called "MyLDAPServiceTransport.xml". The content of the file should be:
<?xml version="1.0" encoding="UTF-8"?>
<scr:component xmlns:scr="http://www.osgi.org/xmlns/scr/v1.1.0"
    configuration-policy="optional" immediate="true"
    name="com.ibm.form.examples.MyLDAPServiceTransport.service">
    <implementation class="com.ibm.form.examples.MyLDAPServiceTransport" />
    <service>
        <provide interface="com.ibm.form.nitro.service.services.IServiceTransport" />
    </service>
</scr:component>
3. Modify the META-INF/Manifest.mf file:
Manifest-Version: 1.0
Bundle-ManifestVersion: 2
Bundle-Name: MyLDAPServiceTransport
Bundle-SymbolicName: MyLDAPServiceTransport
Bundle-Version: 1.0.0.qualifier
Bundle-RequiredExecutionEnvironment: JavaSE-1.6
Service-Component: OSGI-INF/*.xml
Import-Package: com.ibm.form.nitro.service.model,
com.ibm.form.nitro.service.services,
com.ibm.form.platform.service.framework.i18n
4. Copy the java source into the project and place it in the desired package.
MyLDAPServiceTransport.java|View Details
5. Save the project
6. Export the code as a jar file and deploy it into the Leap extensions directory. Check the SystemOut.log to insure that it deployed without error.


