Workflow Application that uses Open Roles
- Marty Lechleider
- Christopher Dawes
MultipleStagesandOpenRole.nitro_s
Introduction
This is session focuses on a few of the more complex areas of application design. We will teach you how to build a multi-stage workflow that leverages “open” roles.
Create the application
All of the UI components of the application have been provided for you, since the focus of this exercise is to work with stages and access permissions. Since we don't have a full LDAP configured with the environment this application provides a “mapping” table that connects users with managers so that we can test out this form to its fullest.
Adding New Stages to your application
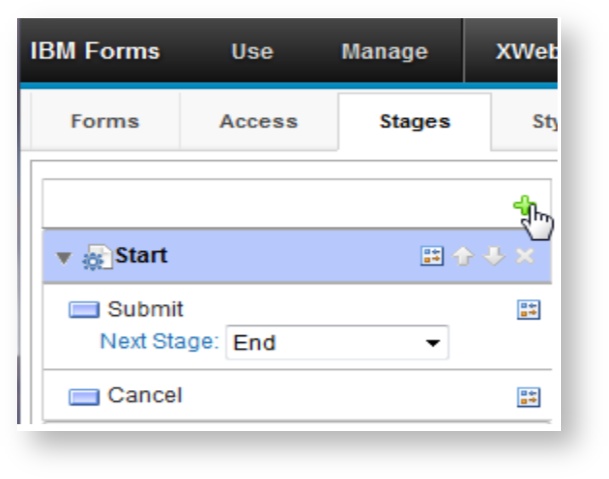
Click on the Stages tab.
Create a new stage by clicking on the green plus icon.
Expand the newly created stage by clicking on the arrow next to the name and then click its properties icon.
Change the title to “Manager Review” and then on the Advanced tab change the ID to “ST_MgrReview”.
Click on the properties icon for the default submit button. Change its title to “Approve” and its ID on the Advanced tab to S_Approve.
Click OK to close the Action Properties dialog.
Add a new submit button by clicking the green plus next to either of the two existing buttons and select Add a submit button.
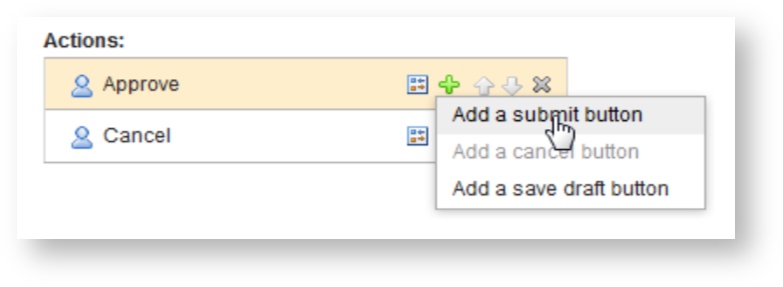
Click on the properties icon for the new button and change its title to “Reject” and its ID on the Advanced tab to S_Reject.
Click OK to close the Action Properties dialog.
Click OK to close the Stage Properties dialog.
Add two more stages. Change the title of the first to “Approved” by clicking the title and then directly editing it and then open the properties to change the id to ST_Approved. Change the title of the second to “Rejected” and its id to ST_Rejected.
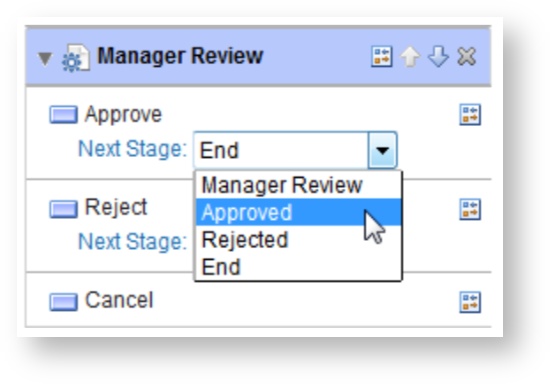
- Expand the Manager Review stage. Change the Approve button to point to the Approved stage by selecting it from the dropdown. Change the Reject button to point to the Rejected stage by selecting it from the dropdown.
Expand the Start stage. Change the Submit button to point to the Manager Review stage.
Now that we have our basic workflow structure in place, let's recap. The employee opens the form fills it out and submits it to the manager review stage. The manager will receive an email with a link to the form, they will open it and either approve or reject the request. In both cases the employee will receive an email indicating the managers action.
Configuring the Access Permissions
Before we can configure the emails that get sent when we submit the form we need to setup our roles and access permissions.
Click on the Access tab.
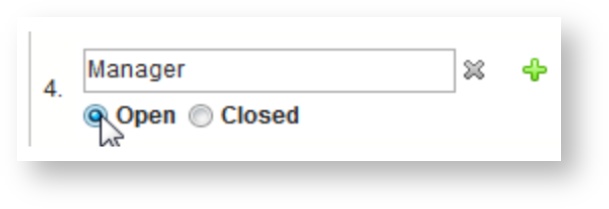
Click on the green plus to create a role that will be used for the current employee's manager. Change the role name to Manager and click the radio labeled Open.
Now that we have created the role, we need to set its permissions. We are not going to Assign any users, because this will be a dynamic role where the member will be added at run-time using a service. Click Stage Settings.
Now we need to to check each stage and set the permissions according to our goal. The default behavior for the start stage is that all authenticated users can launch the form and submit (create), therefore we will not change it.
Click the Manager Review stage and then give the Manager role Read and Update permission.
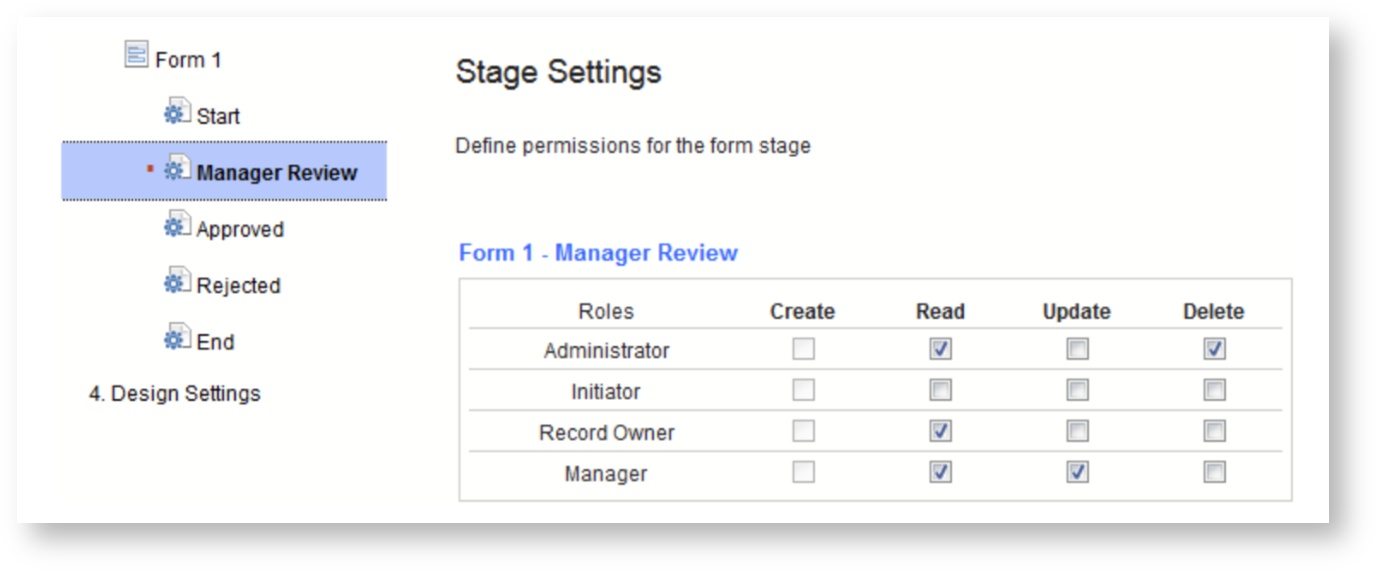
Click the Approved stage and give the Manager role Read and Update.
Click the Rejected stage and give the Manager role Read and Update.
Now that the Access permissions are configured we can move on to the next step.
Configuring Email Submit Activities
Now lets go back and configure all the emails for each stage. The first email that we will create is the one that gets sent to the manager indicating that they must take action on an employee submission.
Click on the Stages tab.
Expand the Start stage and click on its properties icon for the Submit button. In the properties
dialog click on the Basic tab.
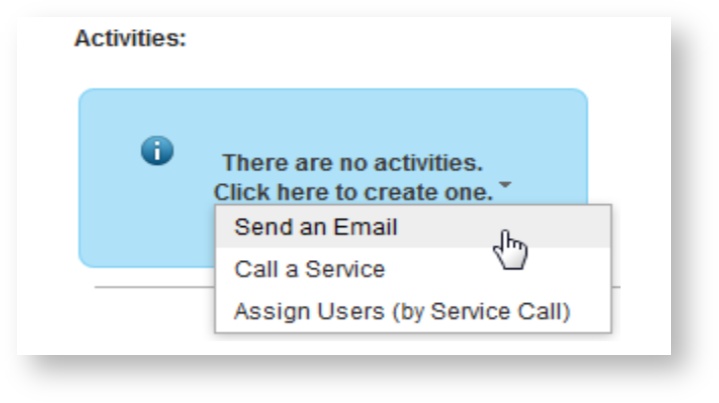
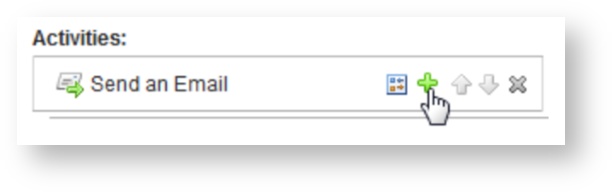
Scroll down until you find the Activities section. Add an Assign Users (by Service Call)
activity.
Add a Send an Email activity.
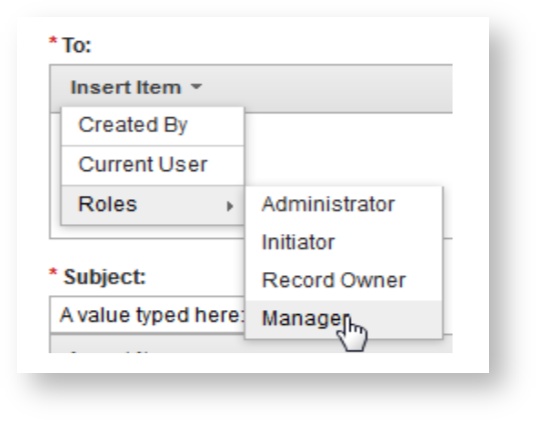
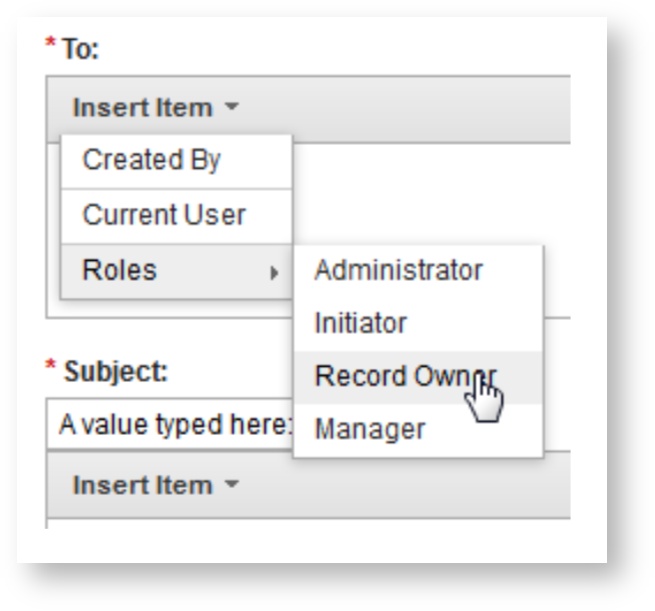
For the To field, click the Insert Item dropdown and select Roles ... Manager.
In the Subject enter something like “ACTION REQUIRED – Employee Leave Request”.
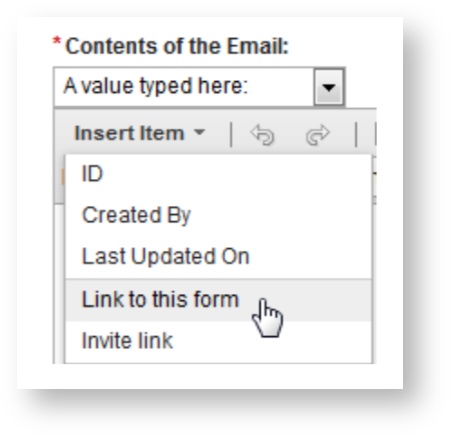
- In the Contents of the Email enter something like: “Please review your employee's leave request by clicking on the link below” and then click the Insert Item dropdown and insert Link to this form. This will insert a link that will open the specific form. At this time you cannot edit the text of the link.
Click OK to close the email properties.
Click OK to close the Submit button properties.
Now you can go back and configure an email on the Approve and Reject buttons in the Manager Review stage. These emails will be sent to the Record Owner, which will be the user that initially submitted he record. You will find the Record Owner as a selection under the Roles heading in the Email configuration dialog.
Configure Dynamic Role Assignment
Now we need to make sure that the manager to whom the email is sent has access to the submitted record. In this next section we will dynamically assign the employee's manager to the manager role as part of the submit process.
Click on the Stages tab.
Expand the Start stage and click the properties button for its Submit button.
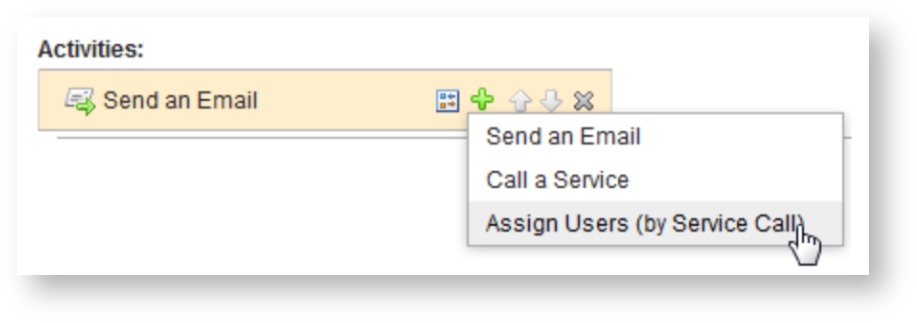
Scroll down to the Activities section on the Basic tab and click the green plus icon to add a new activity.
Add the Assign Users (by Service Call) activity.
Change the Service Catalog to HCL Leap Applications.
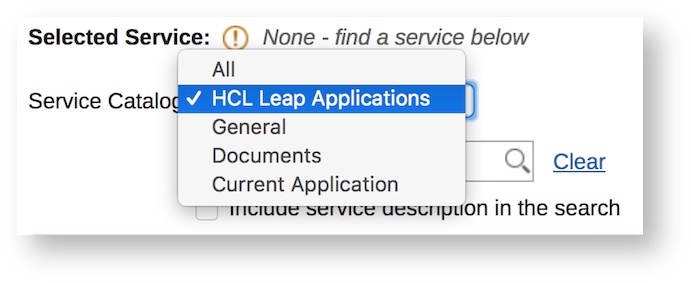
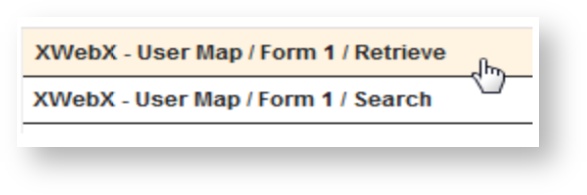
Enter XWebX – User Map in the search field and click the magnifying glass or press enter.
- Select the Retrieve service. And click Next.
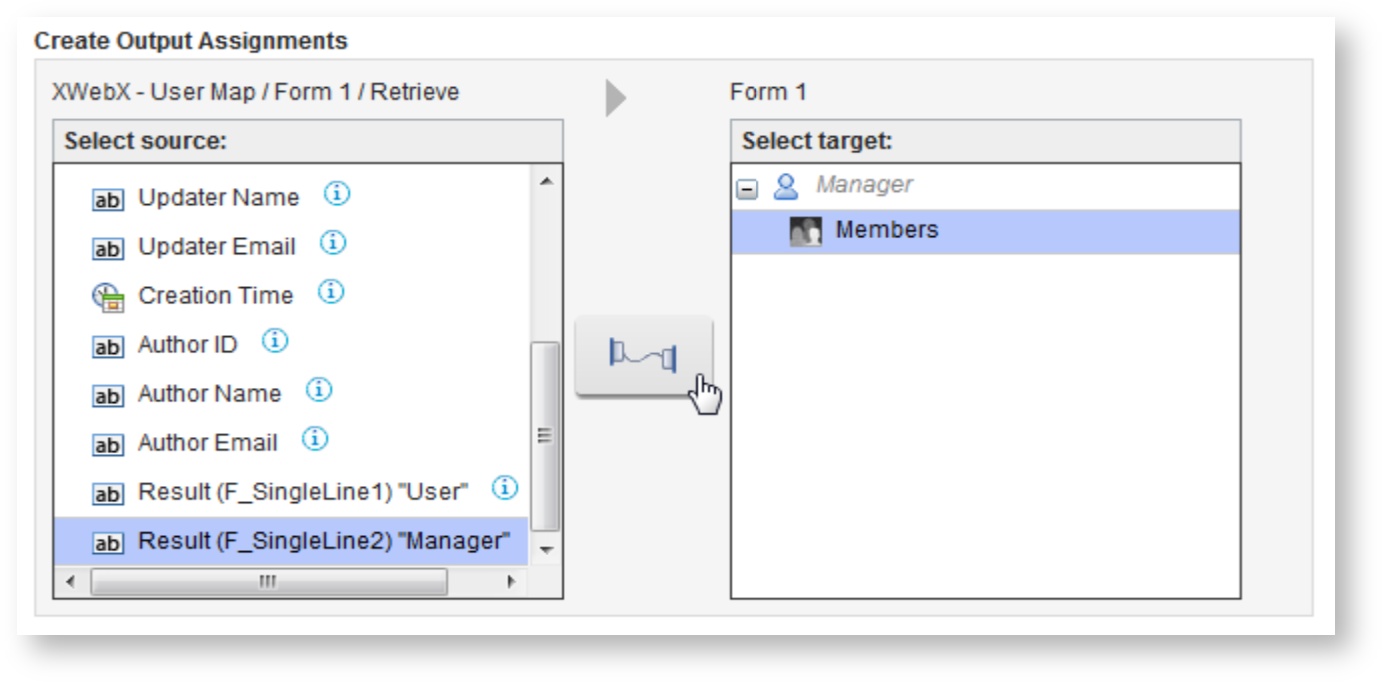
In the Select source window select Current User. In the Select target window select Retrieve
by (F_Singleline1) User then click the Assign Input button. Click Next.
In the Select source window select Result (F_SingleLine1) Manager. In the Select target window select expand Manager and select Members then click the Assign Input button. Click OK.
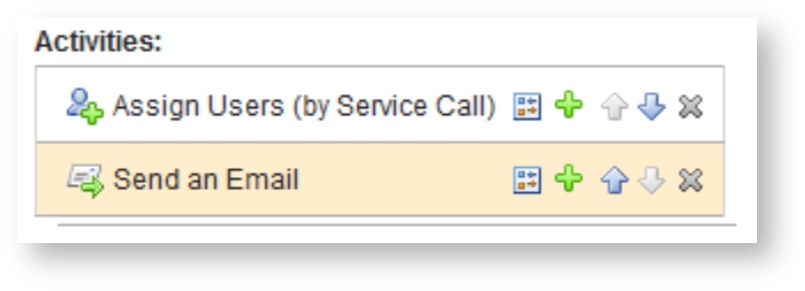
Now move the Assign User activity before the Email activity by clicking on the up arrow.
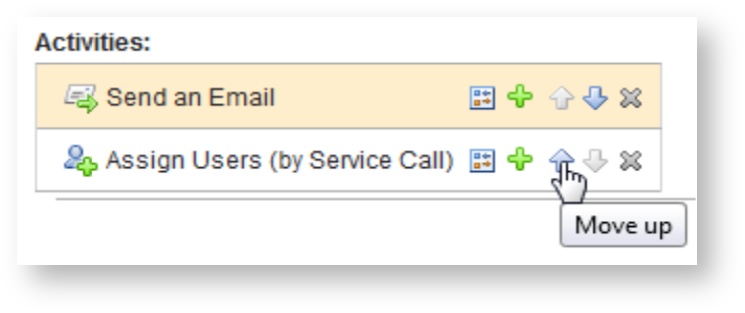
This will insure that the service call gets called first, setting the user's manager into the manager role. The end result will look like:
When you assign a user dynamically it applies to just the one record, rather then the static way where the role assignments apply to all the records. This allows you to create a very dynamic application and provide the precise level of security that is required.
Test The Application
Save and deploy the form.
Launch the form, fill out the fields and click Submit.
We don't have any way of checking the email for the user, but we can verify that the manager now owns the record.
Log out of FEB.
Find your user in the User's Spreadsheet and login to FEB as the listed manager.
Click View Responses for the application.
You should see your test record that was submitted.
Control Section Visibility Based on Stage
In this section we will add some behavior to make it even more dynamic. Let's say that you want the manager to be able to add his/her comments before submitting. We need to add a field for the the manager to enter comments but we want to make sure the field is only visible in the manager review stage.
Add a Multi-line Entry to the canvas below the Reason for Leave Request field.
Stretch the field so that is spans both columns and change the label to “Manager Comments”. In
the Properties dialog on the Basic tab set the Width to Full Width and click OK.
Click on the Stages tab.
Expand the Start stage.
Hover over the “Manager Comments” field and click the icon labeled “Click to hide in this stage”:
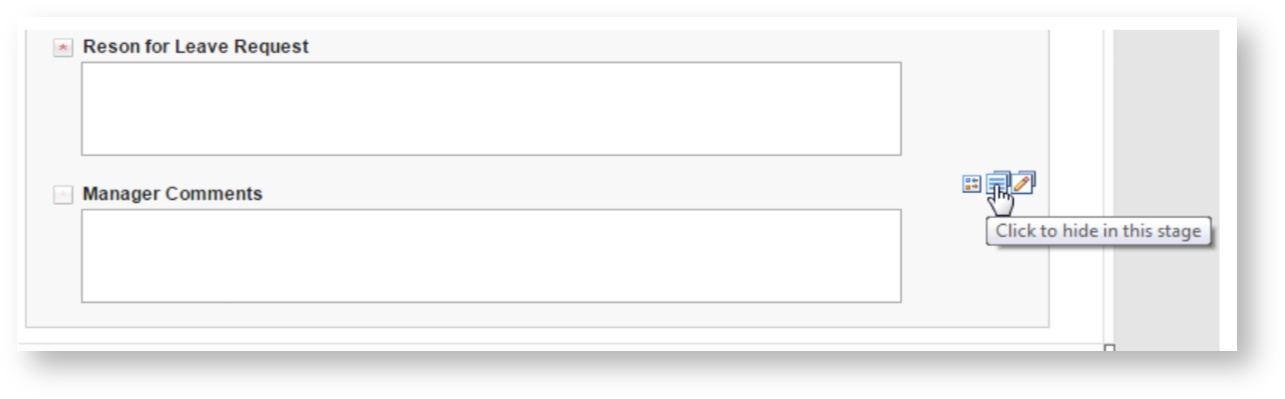
This will insure that the Manager Comments field is not shown when the employee initially launches the form. We will leave it visible in all the other stages since once the record is complete we might want all parties to be able to view the comments.
Save and deploy the application.
Now go back launch the form as an employee and note the manager field is not visible.
Login as the manager, access the View Responses, select the record and then note that the manager comment is visible.
This concludes the lab. Hopefully you can see how using stages and dynamic roles could be used to build some interesting applications. If you have any questions or want to learn more talk to the instructor or check out our resources listed in the next section.