Customer Tracking Application
- Marty Lechleider
- Christopher Dawes
Description
The purpose of this application is to track customer interaction. As the organization interacts with customers they record that interaction in this application. They can create new and update existing customer records. They can attach notes to client records to keep track of the latest activity. Design Features Demonstrated in this Application
- Using a form as a custom UI
- Using a form to capture data that will not be viewed by users
- Calling services to access data in another form − triggering code after a service completes
- Removing the action buttons from a table
Application Functionality
In an effort to help you understand how this application was built we will break it down into its functional parts and look what is required to make each one work. We will look at the basic structure of the application as well as what is required to create customers, update customers and to add notes to a customer record.
Basic Structure
When building an application the first thing to consider is the structure. This application will keep track of customers for which we need a table-like structure. Each customer can have numerous notes and therefore we need a second table-like structure to hold the notes. There are two ways to look at designing an application like this:
- Each table-like structure that is needed is a form within the application
- The table-like structure for the customer is a form, however the notes would be kept in a table object of that same form.
- The Customer form would be the form rendered to the user and contain the data.
Let's pause for just a moment and look at which of these approaches is best. The most significant limiting factor is the ability to dynamically update a table object using a service. As of Leap 8.6 you can only perform search, retrieve and create operations on a table. You cannot update individual rows of a table, therefore #2 is not really viable.
There is a little bit of extra work that has to go into the first option as we have to associate the rows of the Notes form with the correct row of the Customers form.
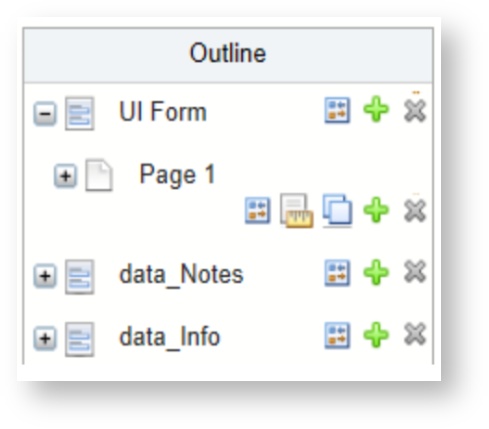
The design chosen in this example is to create a Customer form (data_Info) and a Notes form (data_Notes) and then a form that will be what the user's interact with (UI Form). By creating a separate UI form it allows us to keep the data in the other tables pure, in that we are not adding any extra fields to accommodate how we want the UI to behave. Some operations become very complicated if you try to do it all in one form, for example, showing a list of all the current customers. Where does something like that go if you just have one form in your application?
Create Customer
We have to define what information we want to track for each customer and then create those fields in the data_Info form:
Let's move on to the next step, now that we have decided how the application will be structured.
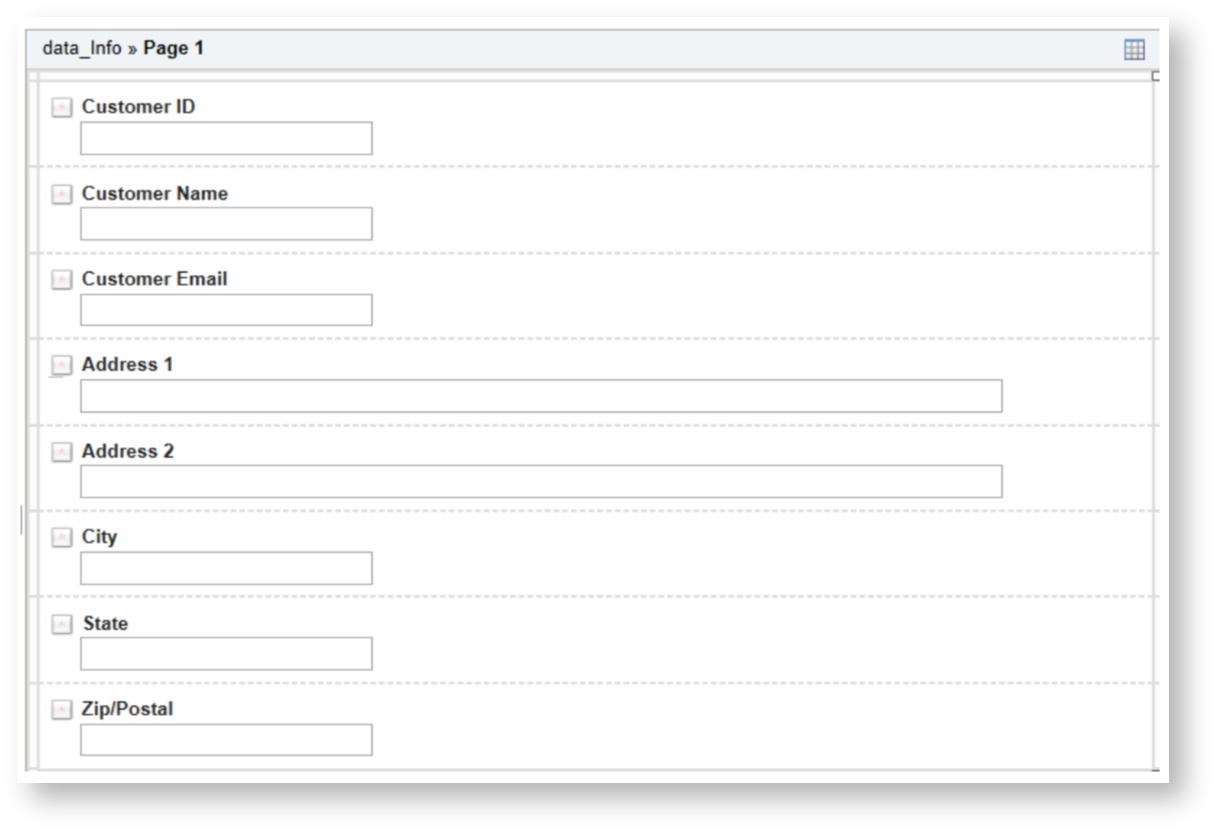
Here you have a choice, you can either use all Single Line Entry fields or you can use the real data type fields (i.e. dropdown, number, etc). In this case I have opted for using Single Line entry fields, since the user will never see this form I don't have to worry too much about the field layout or controlling/restricting user input. The only change that you may have to make is the “Maximum number of characters” for any field where you want to allow more than the default of “50” characters.
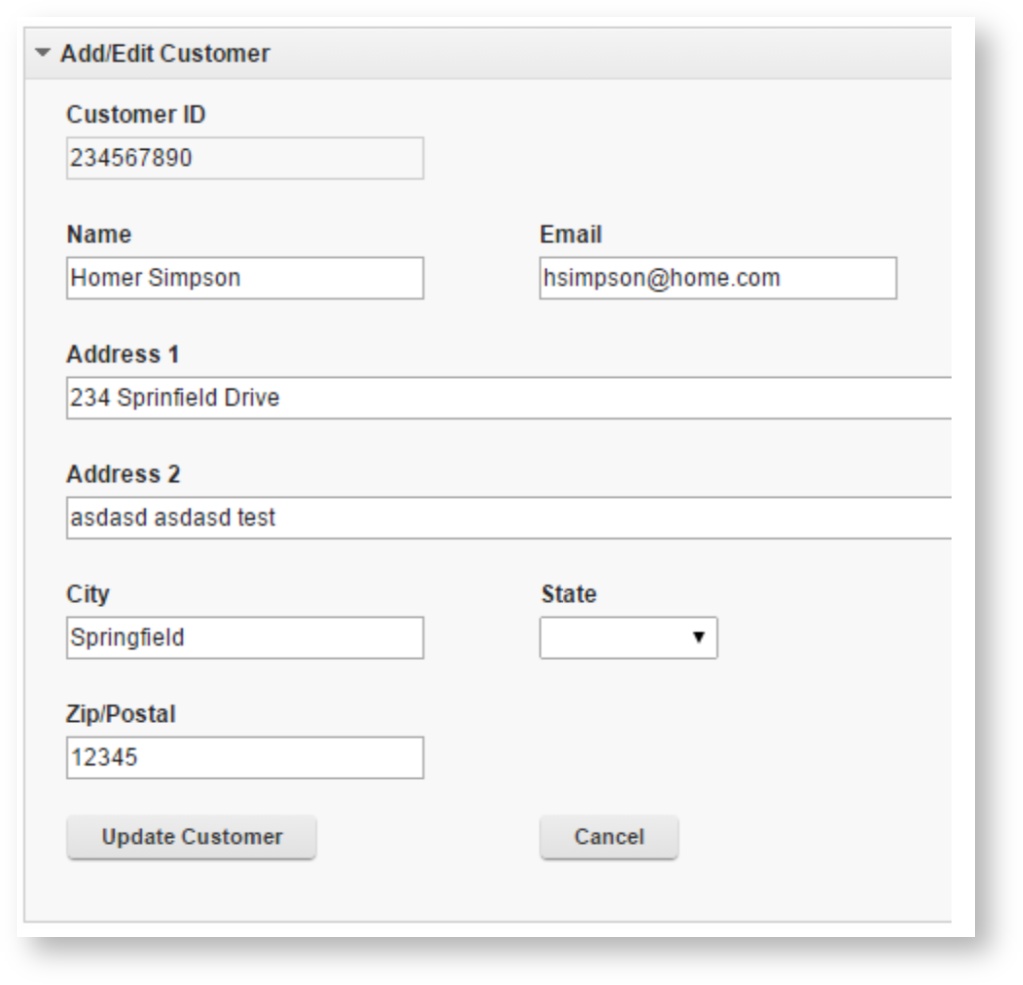
Next we mimic the same fields in the UI Form:
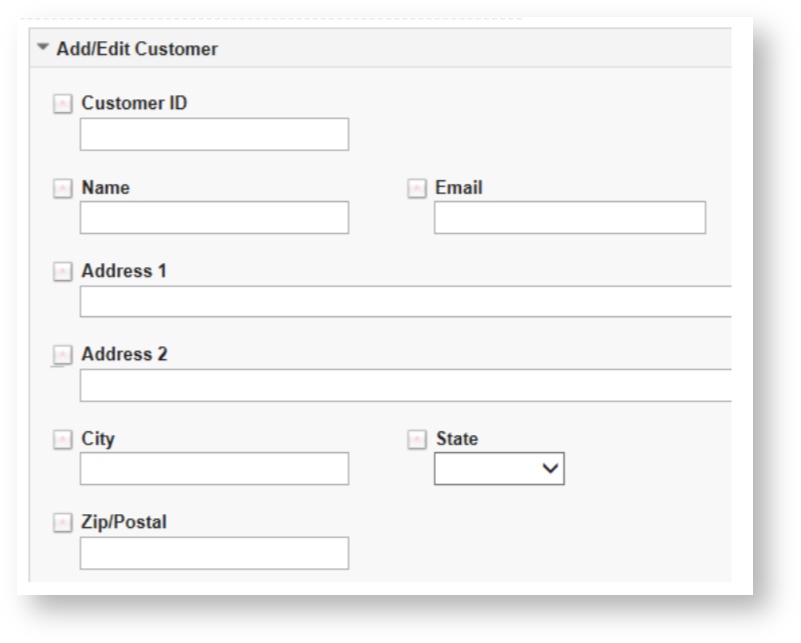
This time we do care about how the form looks and controlling user input. We put the fields into a section and choose the appropriate field type for the information being gathered.
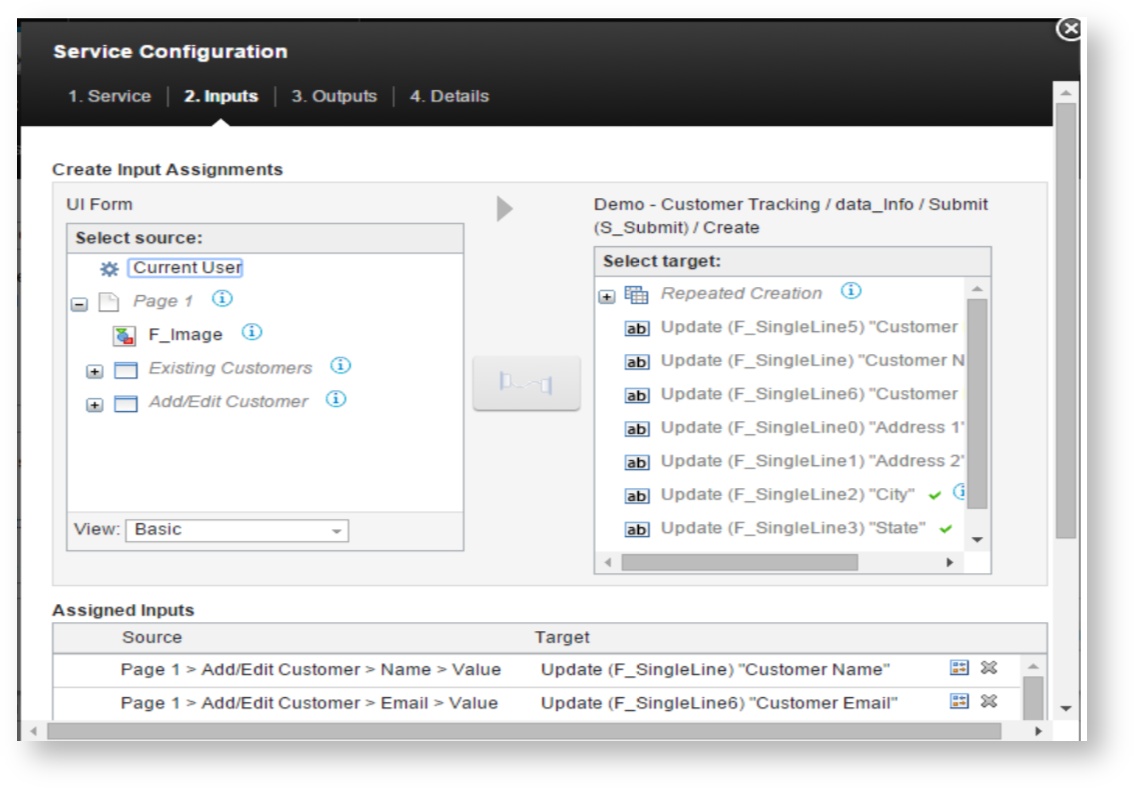
We now have the form that will keep track of the customer data and the UI that the user will use to enter it. The UI Form is connected to the data_Info form by using a Submit / Create Service Configuration.
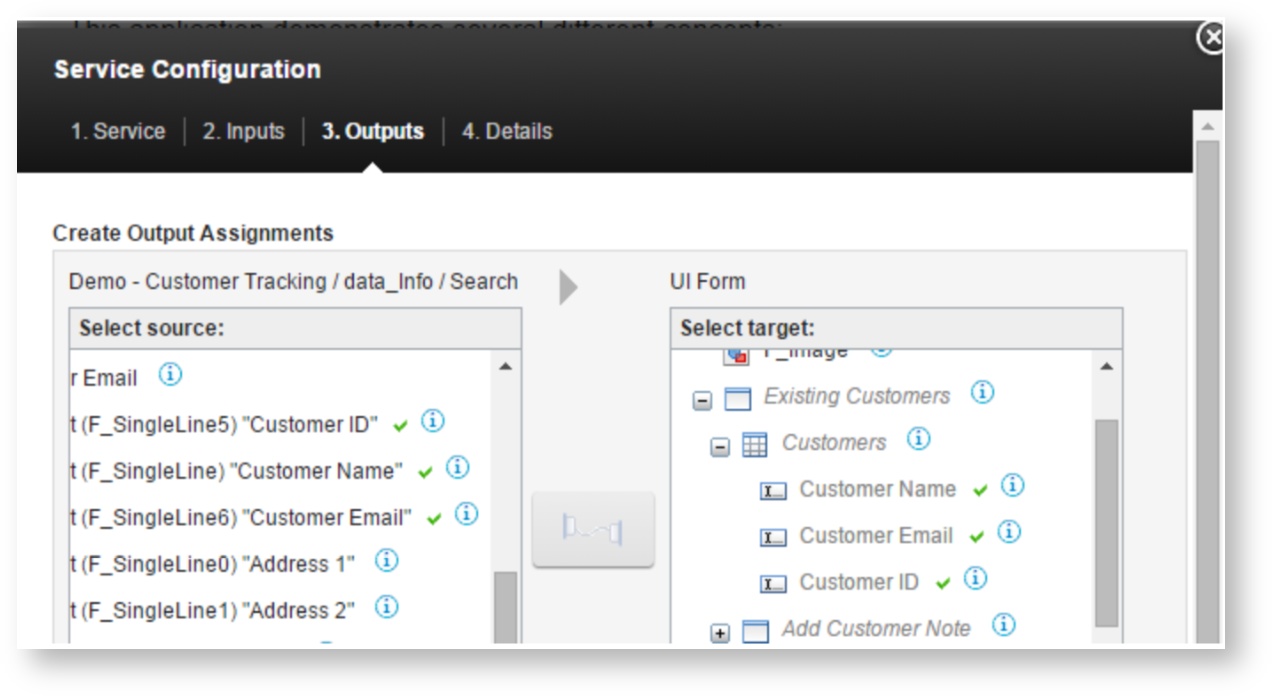
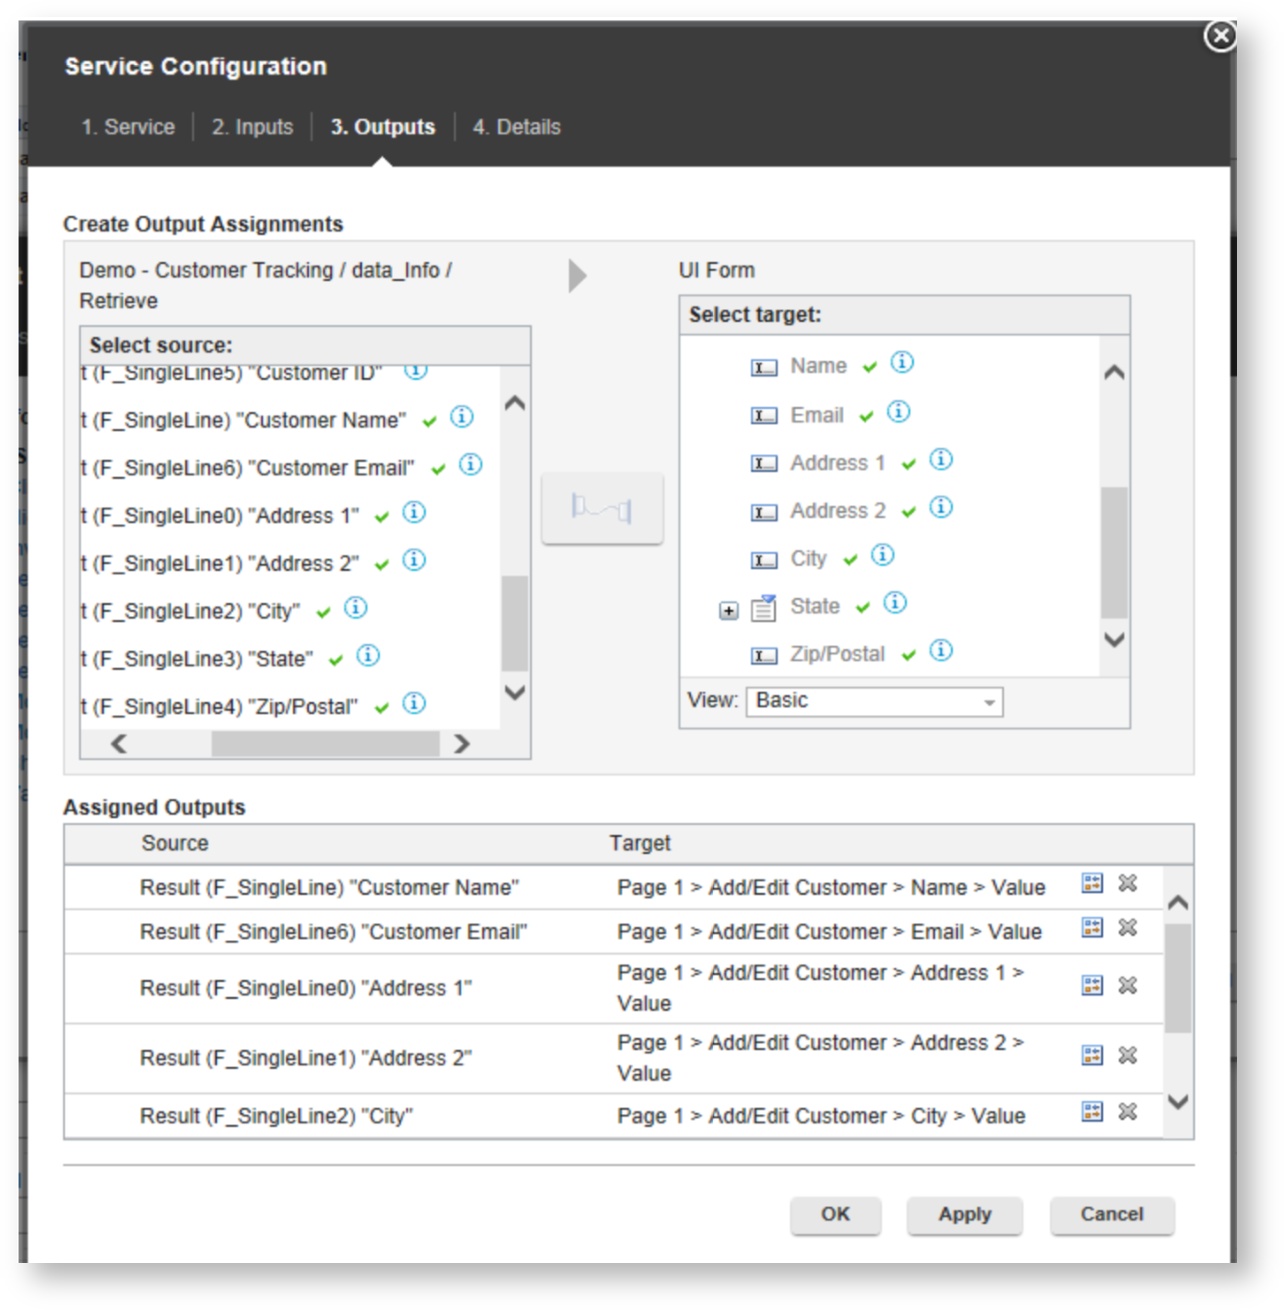
Each of the fields on the UI Form is connected to the corresponding fields of the data_Input form.
Note: To link a set of fields select a field on the left, then on the right and then click the connection button in the middle.
Launch the UI Form, fill out the fields and then click the Add Customer button. To verify if you record was created, close the form and open the View Responses from the manage page. Click on the data_Info tab and you should see a customer record, if you don't or you received an error after clicking the Add Customer button then its time to troubleshoot.
This example could be improved by first searching to see if the Customer ID that the user entered already exists as you may not want to allow duplicate entries of the unique key! This document will not go into detail for that enhancement, but it will require using a Search service to check if the customer ID exists and then executing the Submit / Create if the ID is not found.
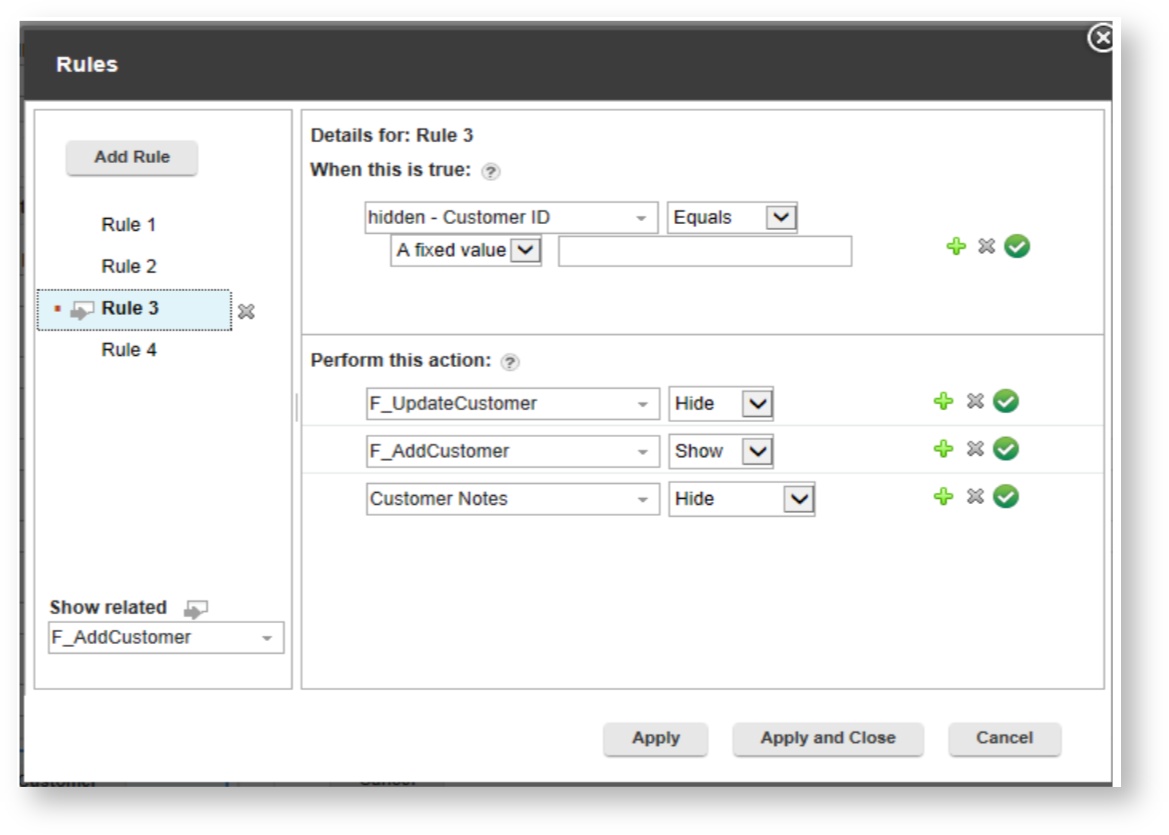
The Add Customer button will call the service to create the customer. We only want this button to show when the hidden – Customer ID is empty (this means that the user did not select a row in the existing customers table and is creating a new record). I used a rule to control the visibility of the button:
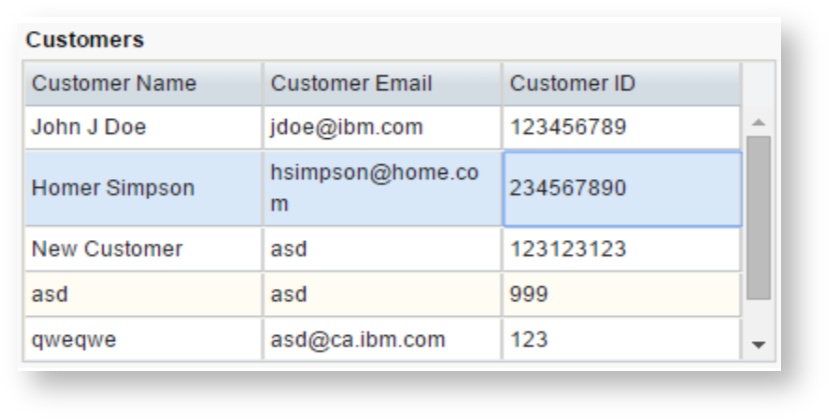
View Customers
The Customers table shows the customers that have been created. Its data comes from a Search service configuration that returns all the records in the data_Info form.
The service is called in the onShow event of the table:
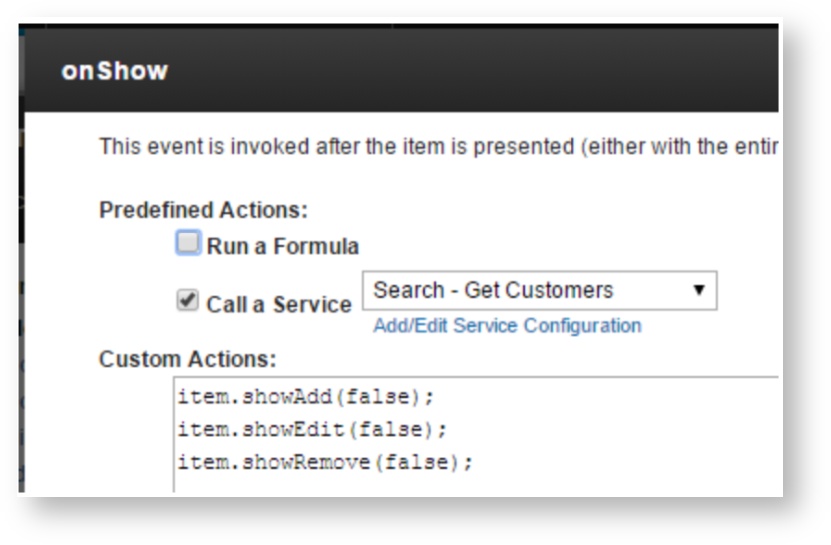
Note: The table action buttons are hidden by using custom javaScript in the same event.
In the service, no inputs are defined, on the Input tab, which will return all of the records from the data_Info form. On the Output tab each field from the service is linked to the columns of the table.
After the service completes there is some clean-up that needs to be done. There is a service call listener in the onLoad event of the form that does the work:
var srv_AC = form.getServiceConfiguration('SC_AddCustomer');
      srv_AC.connectEvent("onCallFinished", function(success)
      {
        if(success) {
          BO.F_hiddenID.setValue('');
         //clear client fields
          BO.F_name.setValue('');
          BO.F_custID.setValue('');
          BO.F_email.setValue('');
          BO.F_address1.setValue('');
          BO.F_address2.setValue('');

BO.F_city.setValue('');
          BO.F_state.setValue('');
          BO.F_zip.setValue('');
         //clear any table selections
         form.getPage('P_NewPage').F_Table.setSelection(-1);
         form.getPage('P_NewPage').F_Table0.setSelection(-1);
         //refresh customer table
         form.getServiceConfiguration('SC_GetCustomers').callService();
         //refresh note table
         form.getServiceConfiguration('SC_GetNotes').callService();
        }
});
The code clears all the fields in the Add/Edit Customer section and calls the services to refresh the customer table and the note table.
Update Customer
Each customer that is created can also be updated. There are a few parts to this feature of the application; selecting the customer to update and then submitting the changes.
Get the Selected Customer Detail
The user needs to first select which customer they want to update.
And then that customer's detail appears in the Add/Edit Customer section so that they can review and make edits.
How does this work? Let's look at the application logic:
User clicks a row of the table.
The customer id for the selected row is saved in a hidden field, so it can be used in a service call.
A Retrieve service call is performed to return the details for the selected customer.
Let's look at the code involved. In the onClick event of the Customer table we see the following:
var r = item.getSelection();
if(r !== null) {
        //set the customer ID into the temp field
        BO.F_hiddenID.setValue(r.F_SingleLine1.getValue());
        //set the customer info into the fields for update
        BO.F_custID.setValue(r.F_SingleLine1.getValue());
      }
This code verifies that a row has been selected and then copies the customer id to the Customer ID field in the Add/Edit Customer section. In the onItemChange event of the Customer ID field I have the following JavaScript:
if(BO.F_hiddenID.getValue() !== '') {
        form.getServiceConfiguration('SC_GetCustomerDetail').callService();
}
I want to make sure that this service is only called when the field is not empty. There will be times where we clear the field's value and if we don't use this code then the service will run, returning an unexpected result.
The service returns all the detail for the customer id specified in the field.
After the service completes we perform the same clean-up work that we did for adding a new customer. There is a service code listener in the onLoad event of the form properties:
var srv_UC = form.getServiceConfiguration('SC_UpdateCustomer');
      srv_UC.connectEvent("onCallFinished", function(success)
      {
        if(success) {
          BO.F_hiddenID.setValue('');
         //clear client fields
          BO.F_name.setValue('');
          BO.F_custID.setValue('');
          BO.F_email.setValue('');
          BO.F_address1.setValue('');
BO.F_address2.setValue('');
          BO.F_city.setValue('');
          BO.F_state.setValue('');
          BO.F_zip.setValue('');
         //clear any table selections
         form.getPage('P_NewPage').F_Table.setSelection(-1);
         form.getPage('P_NewPage').F_Table0.setSelection(-1);
         //refresh customer table
         form.getServiceConfiguration('SC_GetCustomers').callService();
        }
});
Create Customer Note
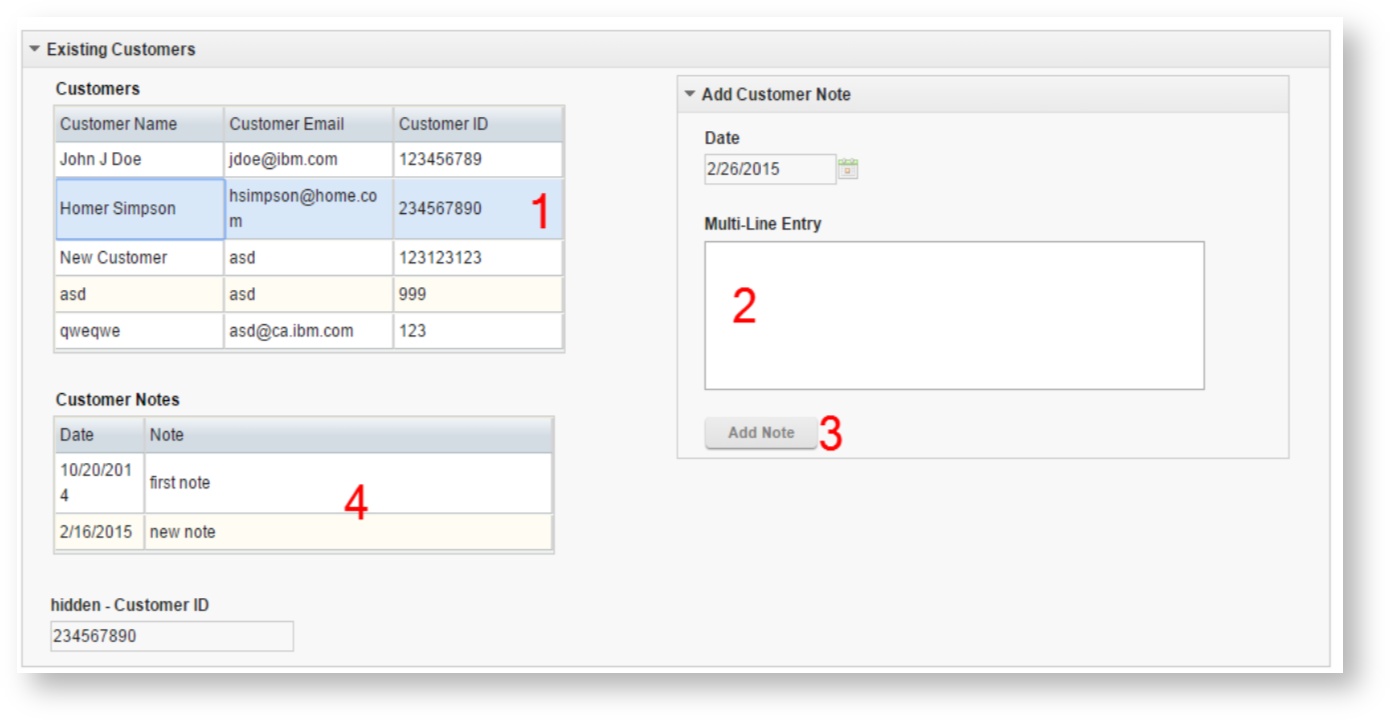
Let's first look at the functionality of this section and then dive into how it is implemented.
- Select a row in the Customers table.
- The Add Customer Note section appears, enter in a comment.
- After tabbing out of the note field the Add Note button will become active. Click the button to attach the note to the selected customer.
- After the note is attached the Customer Notes table is refreshed so that the note can be viewed.
Now let's break down what you need for each part.
Customer Table
We can skip over the customer's table because we are leveraging the same hidden field that is populated when the user selects a row of the Customer table (this was discussed earlier in the document).
Add Customer Note Section
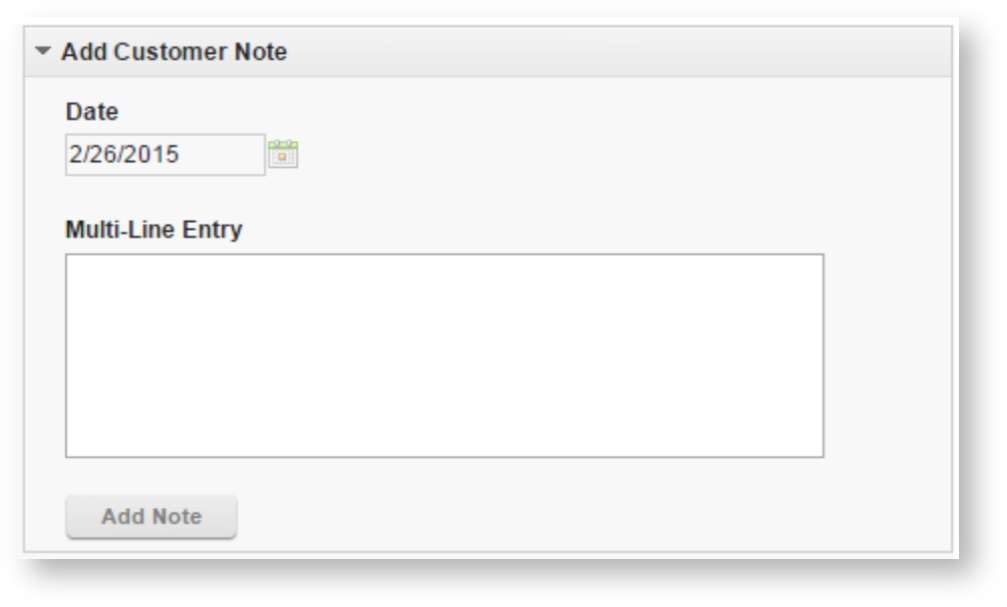
First, it is important to remember that the notes are stored in a different form within this application called data_Notes. This section that we have created is just providing a way of interacting with the data in that other form.
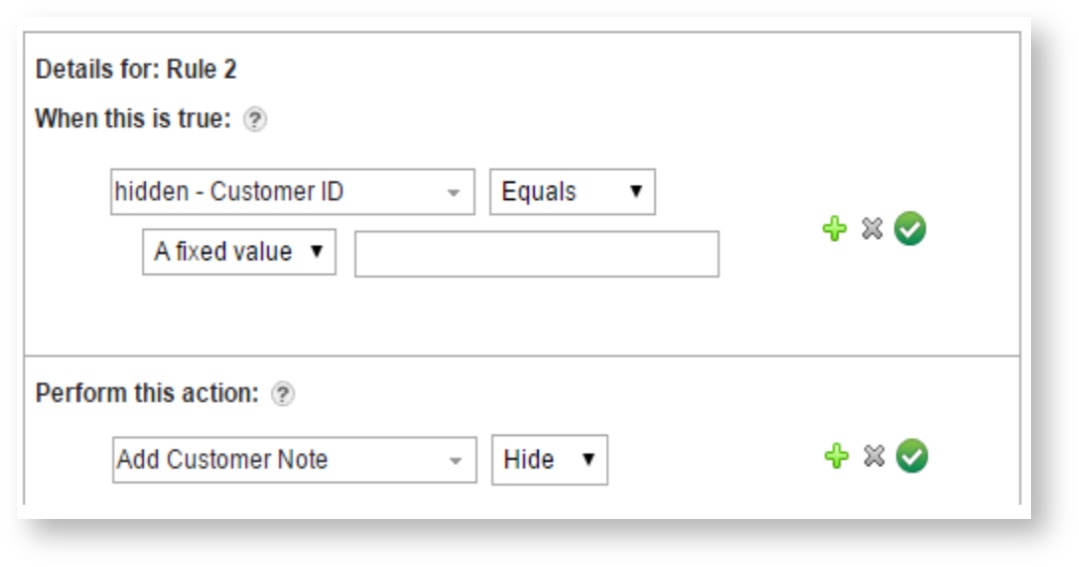
The Add Customer Note section is controlled by a Rule; if the hidden customer ID is empty then hide the section:
The Date field cannot be edited by the user and is automatically set to the current date. This is accomplished by using javascript in the onShow event of the date field:
BOA.setValue(new Date()); //sets the date to today
item.setActive(false);  //makes the field inactive
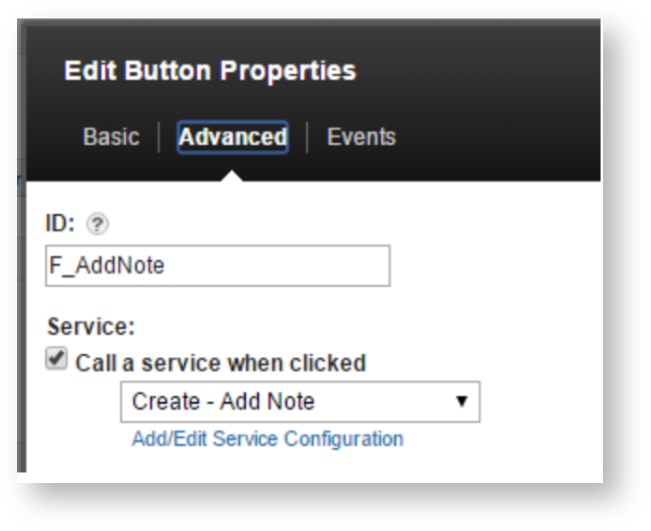
The Add Note button uses a service to insert the note information into the data_Notes form. The service is triggered when the button is clicked by defining it in the Advanced properties of the button:
The service performs the Submit / Create operation for the data_Notes table and looks like this:
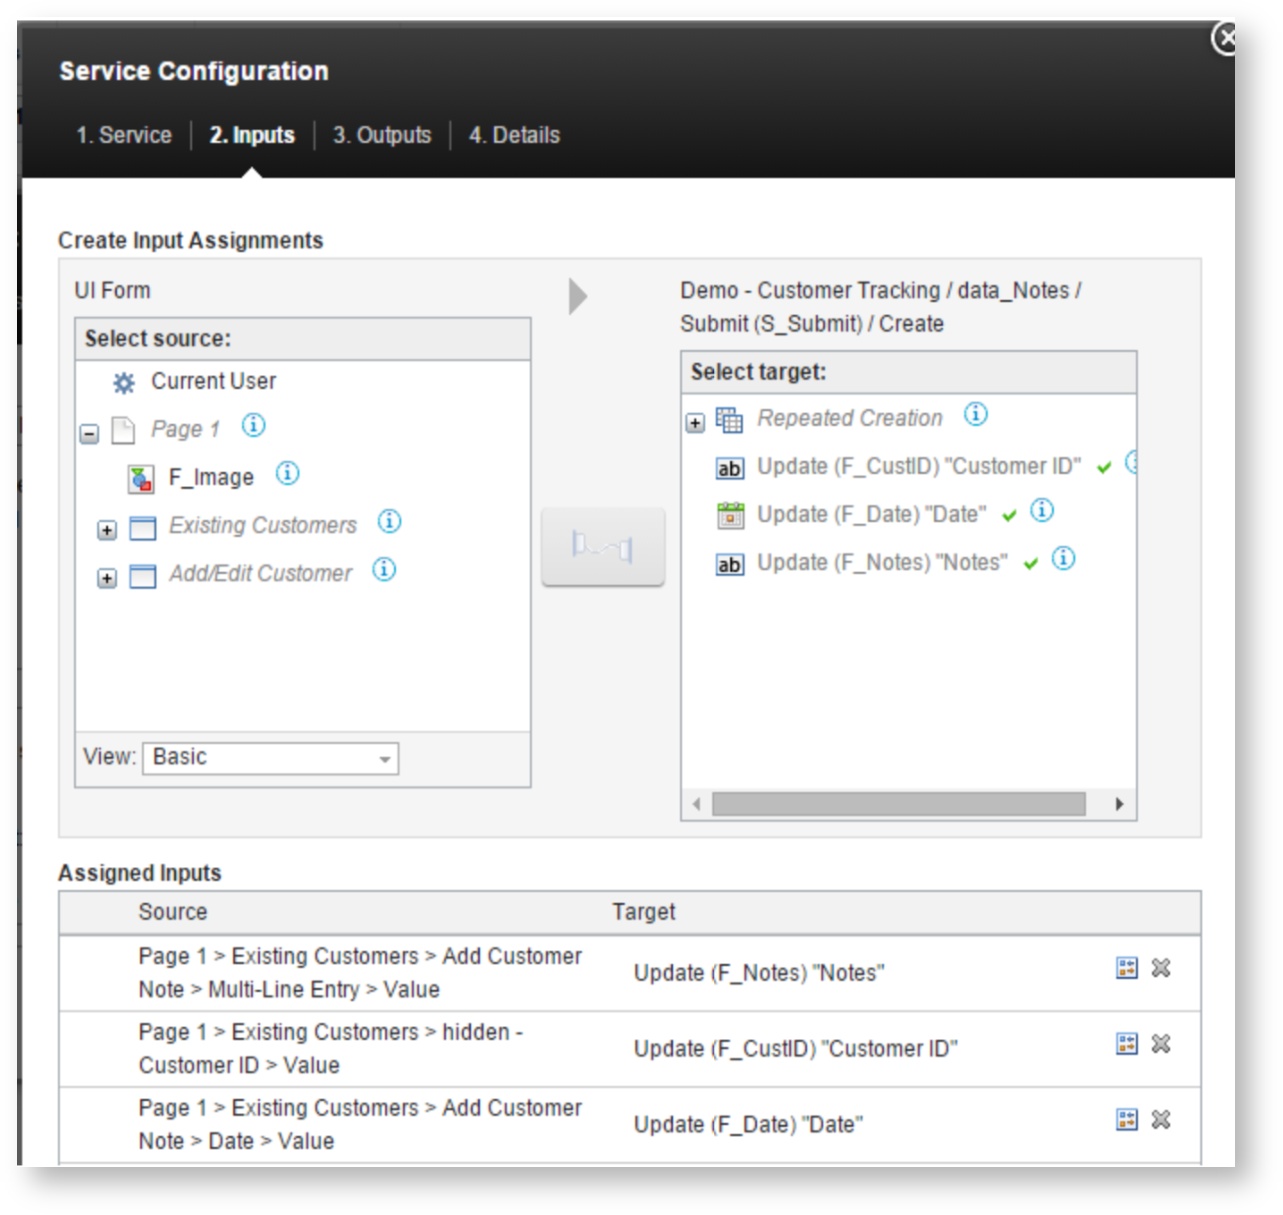
- There are a few things to take note of:
The fields from the Add Customer Note section are linked as inputs to the service and connected to the matching fields in the data_Notes table. - In this version of the application we are not linking anything from the Outputs. As an enhancement you could link the Number of Records created to a field in your form and then react if the note was not created.
- It is a good idea to change the Label and ID of the Service to better describe the operation being performed. If you don't, then referencing them in custom JavaScript code becomes confusing.
After the Service runs to create the note record we need to clear the field in the Add Customer Note section and we need to refresh the Customer Notes table. To accomplish this we use a service call listener that is defined in the onLoad event of the form:
var srv_AN = form.getServiceConfiguration('SC_AddNote');
      srv_AN.connectEvent("onCallFinished", function(success)
      {
        if(success) {
         //clear note field
          BO.F_Paragraphtext.setValue('');
         //refresh note table
         form.getServiceConfiguration('SC_GetNotes').callService();
        }
});
Customer Notes Table
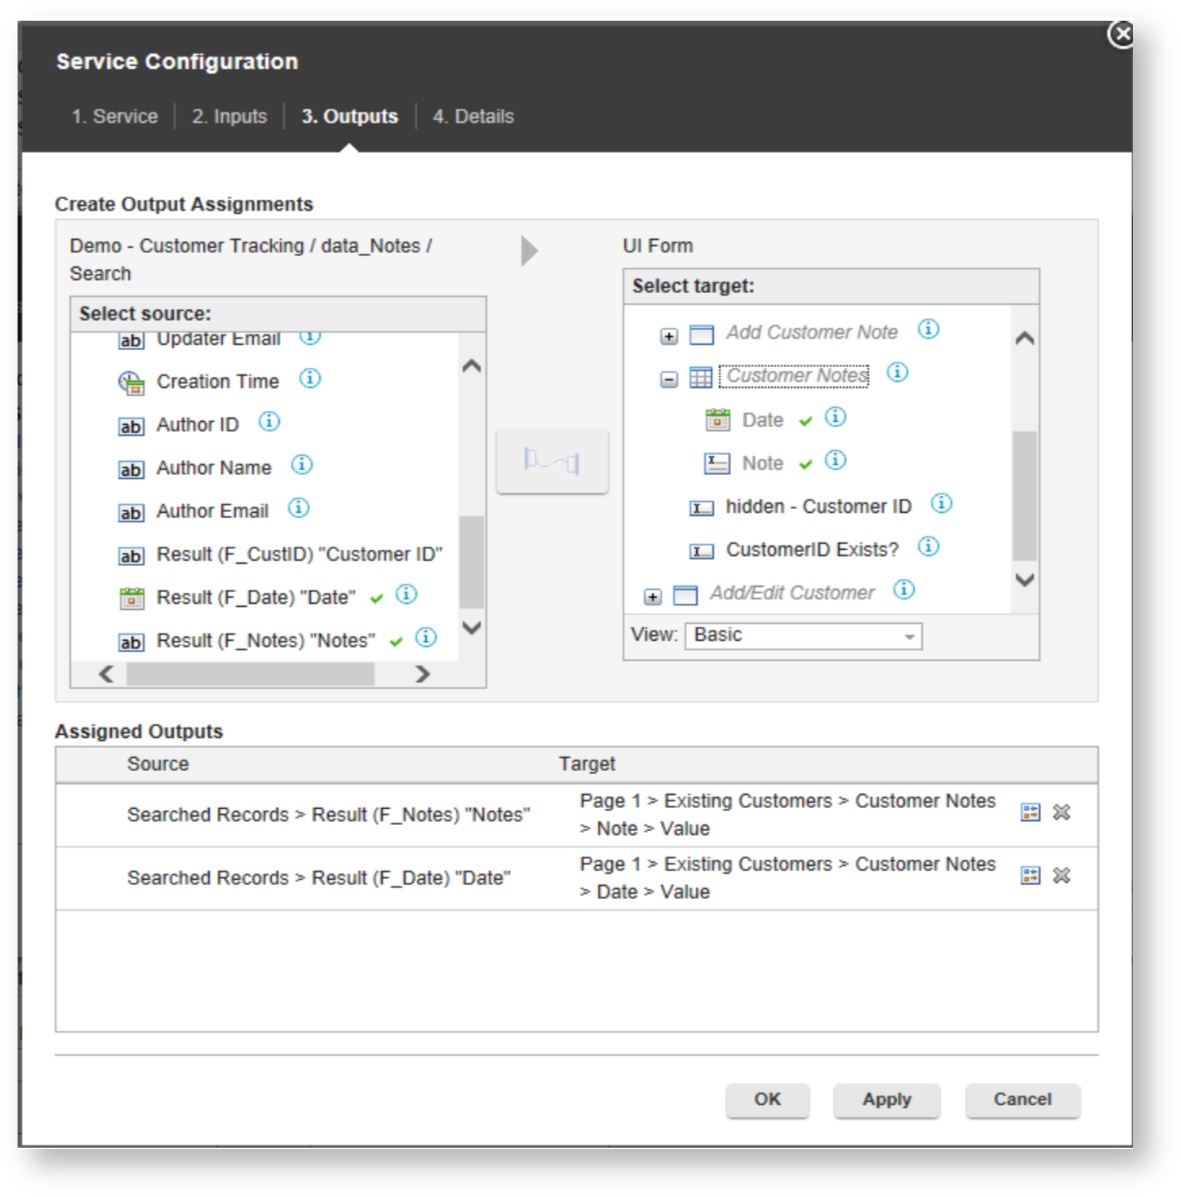
The Customer Notes table is populated from a service that returns all the records in the data_Notes form that match the customer ID in the hidden – Customer ID field.
The service is triggered in the onItemChange of the hidden – Customer ID field:
if(BOA.getValue() !== "") {

        form.getServiceConfiguration("SC_GetNotes").callService();
      } else {
        //clear the Customer fields
        app.getSharedData().getItem(page.F_Section0);
      }
Applying the Concepts to Your Own Applications
Now that the application and its functionality have been described the next step is for you to figure out how to replicate them in your own application. This can be a bit tricky, especially if you are not comfortable writing JavaScript.
My advice to you would be to
- Make sure you have thought through the flow of your application.
- Make sure you understand the business process well enough that you can compartmentalize the pieces.
- Build the basic structure first before spending time on making it pretty.
- When testing/building start with just a few fields to validate the process then add the other fields after once the process is established. If anything has to change or you have to switch gears then you haven't wasted time adding optional fields.